
Your Guide to? HDR – Using software for HDR
Processing
The Most popular HDR processing sogtware in three easy steps
Photomatix
Step One:
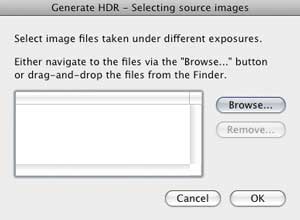
Import your Raw files to your computer, and then open them in your selected Raw processor. Once done, convert the files to TIFF files, so as to retain the most amount of data possible. Load up Photomatix and then follow this by clicking on Process, followed by HDR. This will take you to the HDR generating dialogue box. At this point click on browse, where you’ll be asked to select the images you’d like to merge.

Step Two:
Click on the exposures you want to blend from the browse menu, and then OK. You’ll now be taken to the ‘Generate HDR’ menu, where you have a range of options for maximising your HDR image, such as aligning source images and attempting to reduce ghosting artefacts – check these if you feel your image will benefit.
Step Three:
You’ll now be confronted with a ‘raw’ HDR image that will be in need of tonemapping. To achieve this, click on the tonemapping button, where you’ll then be taken to the tonemapping dialogue box to perfect your image – for a full explanation, take a look at our terms glossary. Once you’re happy with the final image, save as a TIFF file and then reopen the file in Photoshop. Here, apply any further colour, tone and sharpening corrections, and your final image should be there.
Photoshop
Step One:
Either convert your images from Raw to TIFF in Camera Raw and save the files, or work from the original Raw files, then select them in Adobe Bridge, however few or many of them there may be, then click Tools > Photoshop > Merge to HDR. Alternatively, simply open the required images in Photoshop and then click File > Automate > Merge to HDR.

Step Two:
You’ll now be taken to a dialogue box, in which you select the images desired. Click OK and, after a short wait, a preview window will pop up. The preview window presents a raw version of the image which we then have to tonemap – to do so, simply click OK, you’ll be taken back to Photoshop where you then click Image > Mode > 16Bits/Channel.

Step Three:
A new ‘HDR Converter’ dialogue box will now appear – make any small adjustments needed to either the Exposure or Gamma sliders, then hit OK and you’re back in Photoshop to finish the toning using usual image processing tools. Once done, change back to 8 Bits/Channel to save as a JPEG.


Software
 Photoshop CS4
www.adobe.com/photoshop
£615 One of the most accessible ways of creating an HDR image is already an integral part of many a photographer’s workflow. Adobe’s Photoshop first introduced the ‘Merge to HDR’ function in Photoshop CS2, and it offers a range of controls over HDR settings. Best of all, lots of photographers already have Photoshop CS2 or later as part of their workflow, so can begin experimenting straight away.
 Photomatix Pro
www.hdrsoft.com
£99 Considered by many to be the foremost tool in HDR image generation, Photomatix Pro from HDRsoft operates in either plug-in format or as a standalone application. The software is basic in so far as it relies almost solely on HDR processing, and some say that it offers a simpler interface as a result.
Easy HDR
www.easyhdr.com
£80 If you’re looking for a standalone HDR application, there are more options on the market than Photomatix Pro. One of the alternatives is Easy HDR, an application that offers much the same with regards to exposure blending and image tonemapping.