How to Shoot… Black & White – Photoshop: Advanced conversion
Using the Channel Mixer
For the more advanced user, the best way to make a mono conversion is by using Channels. In Photoshop CS there are two ways you can do this; the first is using the channel mixer. The channel mixer looks very similar to the Black & white filter in CS.
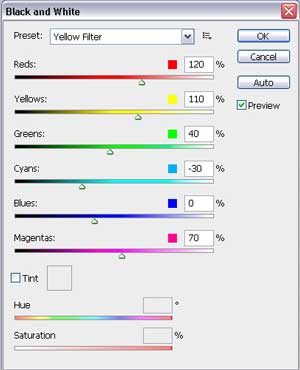
It features four sliders, for Red, Green, Blue and Constant, and a small box in the corner marked Monochrome. Once this box is ticked the sliders can then be used to fine-tune your image; there is also a drop down list of presets (in more recent editions) for equivalent colour filter recipes. The Channel Mixer is accessed from the Image>Adjustments menu.
The alternative is to pick from one of the three colours that make up the RGB image. From the Channels window (accessed from the Window menu) you can click on either the Red, Green or Blue channels to show the tonal information on that colour. Once you find which of the three gives the best result for your image you can discard the other two channels either by deleting them from the list or swapping the Image Color mode to Grayscale (Image>Mode>Grayscale) then back to RGB.