Review of the X-Rite ColorMunki Photo colour calibrator
Manufacturer: X-Rite
Model: ColorMunki Photo
Price: £360
www.colourconfidence.com
Regular readers know that we have tested several colour calibration devices over the years, and that each generation has made this complex subject more accessible to the less techno-savvy among us. In the past we’ve mainly reviewed monitor calibration systems, as these have dropped in price and ease, while printer profiling systems have remained both expensive and complicated for most home users.
Things have changed with the Colormunki reviewed this month.
This is a complete system for profiling monitor and printer, finally giving the enthusiast and semi-pro a simplified and affordable (to more people than before) solution for getting perfect prints from your images. Colour management is an important topic and ensures that the image we see in our camera matches the one we see on our monitor and that we eventually see on a sheet of A4 paper. Because all three devices use different methods of interpreting the information of an image, making that translation between them can sometimes be like a game of Chinese Whispers – each stage of the process produces something slightly different from the one before, with the end result sometimes a far cry from the original version.
It is vital to have an accurate monitor. If you’re trying to correct a colour cast, and the fault is with the monitor not with the image, then you’re going to end up going in circles and produce an image that looks 10 times worse on another monitor or print.
In the case of printing, while most profiles that are included with the printer driver nowadays are reasonable and produce results that are good enough for most people, for the real perfectionist they can be lacking. I’m sure we’ve all produced prints that look nothing like the image on our monitor.
Changes in ink batches can affect colour and, more importantly, using different papers – say a third-party Fine Art Matt for some images, and an Ultra High Gloss for another – can produce radically different results. Don’t even get me started on trying to achieve a neutral black & white or split-toned image.
A major influence over colour, and specifically the differences between monitor colour and print colour, is just the nature of light. LCD and CRT screens work on the principle of transmissive light, that is the image is lit from behind (by the screen pixels) so look much brighter and punchier than a print. A print is lit by light bouncing from the paper surface and reflecting back to the viewer, known as reflective light, and can appear up to 30% darker as a result. Add in differences to the colour of the light that the prints are viewed in which can change the perception of the colour (known as metamarism) and you can soon see how complicated it can all become. Incidentally viewing images with daylight-balanced bulbs is a quick and simple fix.
If we incorporate camera calibration, such as that found in Adobe Camera Raw, we start to get a ‘closed loop system’. This means we have a continuous circle of control, from camera to monitor to printer. That control is lost when we share images over the web with millions of monitors that aren’t calibrated, or have our prints made by an outside source. This is called an ‘open loop system’.
The Colormunki
So, now we know why colour management is so important, let’s take a look at the new device that is, according to the hype, going to revolutionise it – the Colormunki. Pantone, the industry standard in colour management and measurement, brings the device to us. Pantone and Gretag Macbeth were recently bought by X-Rite, whose name is on the device but jointly marketed by Pantone and X-Rite in the UK.
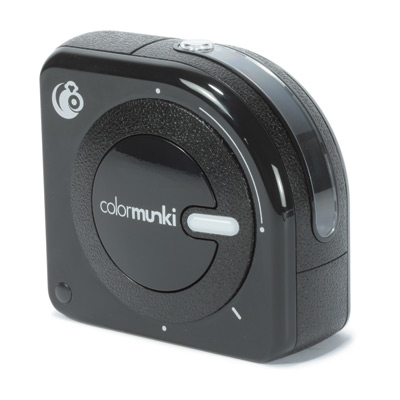
Unlike other all-in-one systems, which consist of separate monitor and print spectrometers, the Colormunki is a single handheld unit, resembling a tape measure. It has a dial on the front for turning it on and switching modes, and comes with a case and weighted strap that aids placement on the monitor.
The first thing to do is install and start the included software. This is a really easy-to-use, step-by-step wizard and doesn’t require you to change any external monitor settings, such as contrast and brightness, before use. The opening screen gives you the option to calibrate the monitor, printer or both as well as a digital projector, so it could be useful for camera clubs. Like other monitor calibrators, the Colormunki dangles from the top of the monitor and measures a series of software-generated colour patches on the screen. The software knows the actual colour values and the device reads the monitor’s projected values, with the difference then being measured and those corrections used to build the profile and correct the screen.
A similar system is used for the print profile. Two test charts are printed and the Colormunki reads the patches and the profile corrects the differences in subsequent prints. However, where the Colormunki is different from other devices, is that, aside from being an all-in-one solution, the charts are read by rolling the device over whole strips of patches instead of reading each patch individually, which is a laborious and tedious chore. Now instead of taking half a day to profile a printer, the Colormunki takes around half an hour (including a 10-minute drying time for each test chart). This makes the idea of regular profiling, say when you change inks or try new paper, much more palatable and convenient.
Once the profile is made it is automatically saved in the appropriate colour management folder on your PC. One disappointment is that the device is designed to work only with Adobe Creative Suite CS3 (including Photoshop) and Quark Express so it’s more aimed at higher-end users than Paintshop Pro or Elements fans. When making prints you need to go into the Print dialogue and set your CM settings to ‘handled by Photoshop’ and then choose the new profile from the drop-down menu.
Also you need to turn off your printer’s colour management system which is usually in the advanced section of your printer driver dialogue box. It should be noted that this isn’t available on all printers, especially the lower-end consumer models. But then you’d be unlikely to buy a £360 calibration system for a £50 printer.
Print quality is definitely improved using the Colormunki, with closer matching to the monitor, as far the gamut allows, and much better black & white prints are possible – always a difficulty using colour inks.
Verdict:
If ultimate quality is important there are more accurate systems, but
they are harder to use and usually more expensive. However, you will
see a difference in print quality using the Colormunki, especially if
printing black & white or toned images. Overall, for producing a
closed loop system the Colormunki lives up to its hype and is a step
closer in bringing affordable and simple colour management to the
enthusiast photographer.
Pros:
Simplicity, versatility, speed of use, improved print quality accurate monitor
Cons:
Still expensive, increased colour patches could build more accurate profiles, limited application support
What Digital Camera Score: 90%