
Bad Weather Photograhy: How to convert to Black & White

3 Shoot the Breeze
Purportedly, Britain is the windiest place in western Europe. While our fondness for the humble sprout can sometimes be held responsible for this blustery reputation, more often than not it is due to our long, exposed coastlines and low mountain ranges.
High winds do indeed entail hardship for us photographers, yet seldom insurmountably so, and these problems seem small when set against the visual opportunities that this energetic element can offer: propellers that spin, windmills that grandly turn, clouds that stream, flags fluttering, lawns of daffodils bobbing, crops bowing in great waves to the changing air pressure, leaves whirling in a vortex, the canopies of trees crashing, waves driven against the shore and the hair of a loved one blowing madly in the breeze… What sublime poetry awaits us on a windy day!
And so to choices: how will this drama be captured? A fast shutter speed will freeze movement; a slower one will emphasise it and lend an artful twist. In order to control the amount of blur present in the scene by having some parts sharp and some not, you’ll find that a tripod is an invaluable accessory. Hammocks that hang from the tripod’s legs are available for not much money. When filled with ballast they’ll lend stability even in very gusty conditions.
4 Convert to B&W
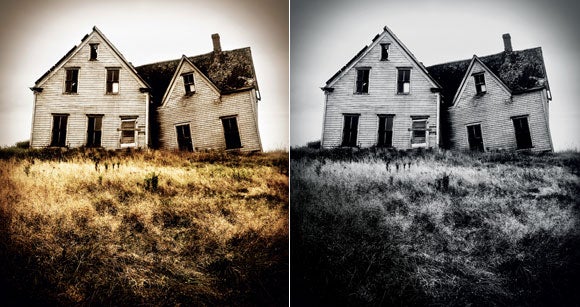
Leaden skies can often make for disappointing colour pictures. So why not consider switching to the stylish tonality of black & white?
Photoshop’s Channel Mixer offers perhaps the most creative options in terms of monochrome conversion, but there is another method, utilising Lab Color Mode, that is easily carried out and can bring great impact to an image. It is especially effective in dealing with tonally heavy photographs, the type frequently captured
during stormy conditions, because it generally
brightens dingy mid-tones.
Follow the steps below to see if this simple method could work wonders for your images.
STEP BY STEP
ONE: Channels
Open your image in Photoshop. You’ll need to see the Channels palette so if it isn’t already visible go to Window and make sure Channels is ticked. If you’re successful in this you’ll be able to see the various colour components that your image is composed from. In this case we have three: red, green and blue as well as a composite, labelled RGB.
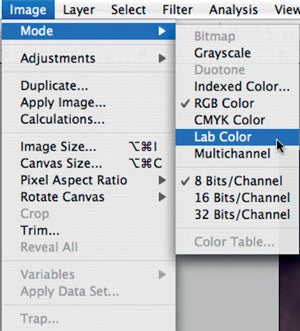 TWO: Lab
Select Image > Mode > Lab Color. Not much will happen to the actual photograph, but your Channels palette should look quite different. Here, red, green and blue have been exchanged for a Lightness channel and two colour channels, a and b. As before we also have a composite of all three, this time called Lab.
THREE: Delete channels
We only need the Lightness information so drag and drop channels a and b into the trash. Also dispose of the spare ‘Alpha 2’ channel that appears. The image should now be purely black & white and lighter than before without any detrimental effects to shadows or highlights. Go back to your original colour mode (Image > Mode > Grayscale, then Image > Mode > RGB).