 When it comes to retouching, Photoshop is definitely the king of the image-editing heap. The program contains a host of tools, filters and adjustment options that can help turn ordinary looking portraits into something truly dazzling.
The sheer power and dominance of the program in this area is not difficult to see, as most glossy magazine covers and celebrity lifestyle stories contain a plethora of photos that have been ‘shopped’ in one way or another. The results, in most cases, are amazing and, in a few instances, even a little scary. But for the average photographer the interest is not about wanting to recreate the plastic look of a celebrity starlet but practise the gentle art of photo enhancement. And in truth, I feel that this is the best use of the retouching power of the program.
So with this in mind, I present here a few of the basic techniques that are used by portrait photographers on a daily basis. Most work with – rather than paint over – the basic structure and texture of the model’s face and, in so doing, they carefully enhance what already exists rather than replace it with something that is manufactured.
PROJECT ONE: Identify and Soften Freckles with the Eyedropper and Layer Blend Modes
There is nothing worse, nor more obvious, than an overworked portrait where the skin’s original texture and tone is replaced with a flat surface that has more in common with plastic appliances than any human being. The example image is typical of the sort of photograph that is normally overworked. In an attempt to smooth out the appearance of the model’s freckly skin, most photographers would completely remove them, resulting in a final portrait that resembles a computer-generated model.
This technique aims to reduce the dominance of the freckles so that the underlying structure of the face shines through and is complemented with, rather than overridden by, just a hint of the freckles. In the end we are left with a result that retains much of the original charm and a definite sense of reality that overworked images always lack.
|
Step 1 – Sample Colour Select the Eyedropper tool and then check to see that the Sample Size (in the options bar) is set to average 3×3 or 5×5 pixels. Next, select a flesh colour from the portrait that represents a mid-tone of the range available across the face surface. Do this by clicking on the picture with the Eyedropper tool. |
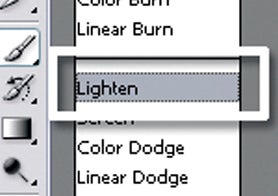
Step 2 – Brush Blend With the skin tone selected the next step is to choose the Brush tool and change the blend mode to Lighten. Do this by selecting the Lighten option from drop-down Mode list in the tool’s option bar.
|
|
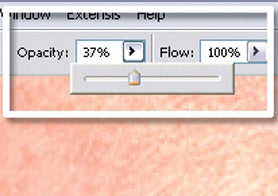
Step 3 – Opacity Change Now adjust the opacity of the Brush. Go to the options bar and reduce the opacity to about 40%. An opacity setting of 100% would produce a result that was too smooth. Reducing the opacity allows a little of the old freckle texture to show through, maintaining the feeling of realism while reducing the freckles’ dominance. You can now begin to paint but be careful not to paint over the eyelashes. |
Pro Tip The tone you select will determine which freckles are lightened. Choosing a darker skin tone will change only a few of the darkest freckles whereas a lighter tone selection will alter both midtone and dark freckles. |