
High Dynamic Range Masterclass: Page 3
Bracketing and Data Maximising
It is possible to create a type of HDR image from a single Raw file, but to achieve true HDR with minimal noise, it is best to shoot multiple exposures using the AEB or bracketing function built into most cameras, or to simply shoot a range of exposures manually in conjunction with a tripod. The reasoning behind the AEB function is to expose one image correctly and then over- and underexpose two more by a selected number of stops. In doing so, you record the maximum amount of dynamic data from your subject, and will in turn have more image data to play with at the processing stage. As shooting HDR is concerned with retaining and displaying as much image information as possible, it is a good idea to shoot the composite exposures in Raw before converting them to TIFFs.
Much the same as including several bracketed exposures, the uncompressed Raw file will contain more image information and will benefit your final image. While it may result in a slightly longer workflow due to demands upon the post-processing capabilities of your computer, the end results will be more than worthwhile. There is a lot of debate as to just how many exposures you need to combine in your finished image, with composites created as a result of anything from two to 16 exposures. However, the general consensus is that for areas of higher contrast you’ll need more exposures, while lower contrast requires fewer. Most cameras have the ability to capture at least three images in AEB mode, and for the majority of scenes that’ll be enough to capture the full dynamic range. It’s often an idea to experiment with the number of exposures, and the range of ±EV values, to see what suits.
How to Shoot an HDR Image
There are many ways to obtain good Raw material for HDR processing. Here are a few top tips…
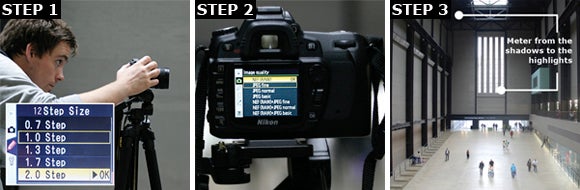
STEP 1 – Minimising camera shake and movement is essential when looking to get a crystal-clear HDR image. Set up your camera on a sturdy tripod and shoot either bracketed images or manually, using a remote, cable release or the self-timer.
STEP 2 – Where camera settings are concerned, try to shoot in Raw at all times. This will allow you not only to perform any minor tweaks needed at a later date, but also to capture the maximum image data for your final image.
STEP 3 – To determine your exposure range, set the camera to auto and meter for both the lightest and the darkest areas of the proposed shot, then set the camera to the middle of the two and shoot the required images in either AEB or manually.