
Your Essential Guide to DSLR Video – Understanding Digital Video
Action!
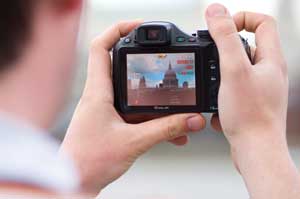
 In order to get the best possible video, we have to change our shooting techniques. One of the problems with using a DSLR is that the camera itself – while in live view mode – is not ideally suited for capturing video. In order to see what you are capturing you have to hold the camera away from your body to view the LCD screen, which can introduce camera shake. A good tripod will cure this problem, but this takes away some of the spontaneity that is enjoyed when shooting handheld. But, as stills photographers we tend to look at pictures in either the Landscape or Portrait orientation too, whereas video has to be shot landscape, unless you want your audience to watch your footage sideways.
Panning too fast across a static scene can make the image look blurry, while a slower pan using a tripod will produce better results. The CMOS sensor, as used by Nikon and Canon, builds up the picture from top to bottom. This can cause distortion when panning as the bottom section of the sensor receives light after the top part, possibly causing some skew in upright lines. Say you were using the camera in video mode during a wedding or other function and someone else’s flash fires – you may end up with a frame that has the flash captured on the upper half only, for example. A CCD sensor does not suffer from these problems.
 Focusing can also throw a spanner in the works. DSLR video modes may turn off autofocus – indeed many cannot utilise it – and base the recording on the focus and exposure as determined using live view prior to shooting. Also, where manual focus is used, it can be tricky to hold the camera steady when turning the focusing ring. Not ideal for tracking a subject when capturing a fast-moving action scene, perhaps. Some more-advanced cameras do have autofocus available, though only one, the Panasonic GH1, has developed new lenses that are silent enough not to be picked up by the inbuilt microphone when finding focus.
Video Sizes
Movies can be captured in a variety of sizes, the smallest standard being 320 x 240 (VGA), and 640 x 480. These sizes are enough for web use, but for high-quality work, or DVDs, they do not offer sufficient quality.
Standard Definition (SD) video cameras capture footage at 576 x 720 – the same resolution as a UK DVD – and these can have an aspect ratio of 4:3 or 16:9 (anamorphic widescreen).
High definition video starts at 1280 x 720 (HD), moving up to 1440 x 1080 (HDV) and 1920 x 1080 (Full HD). The first figure in each case is the number of pixels across, the second figure is the number of lines down, i.e. 1280 pixels x 720 lines is HD 720.
HDV captures 1440 square pixels but converts them to non-square rectangular pixels in order to display full 1920. This process does mean a small loss in image quality.
Given that video uses a fixed pixel size, in theory there should be no noticeable quality difference between a compact camera shooting Full HD to an advanced DSLR such as the Canon 5D Mk II. However, DSLR cameras have a larger sensor size which means the sampled pixels can be further apart, thereby reducing image noise. DSLR cameras generally also have superior optics for sharper focus and more advanced features to make video stand out.
Video Image Sizes
- SD = 720 x 576
- HD = 1280 X 720
- HDV = 1440 x 1080
- Full HD = 1920 x 1080
View, Share Burn – Making the most of your videos
Use your HD TV
As more of us invest in HD TVs, it’s possible to squeeze that extra bit of use out of them. Many cameras now come with HDMI ports, meaning – with the use of an HDMI cable – it’s possible to directly show both your photos and videos straight from camera in large, glorious high definition on your HD TV. As many companies produce a wide range of electronics, there’s greater compatibility too. Take Panasonic’s VIERA HD TV range; connect the Lumix GH1 via HDMI and you can use the TV’s remote control to browse and play back.
Share on the internet and YouTube
YouTube is so popular that even the cheery Prime Minister has used it as a tool to address the nation. Well, you can use it to share your videos too, and it’s free. Creating a profile is quick and easy, and you can quickly share your videos for the world to see – or just your friends. Some cameras come with specific modes to streamline uploading your videos, though it’s not rocket science to learn the process yourself and the site will help you step by step. Other products such as Google Video, Yahoo! Video, and many others offer a similar video sharing service too.
File Formats
Still cameras have an option to shoot in JPEG, TIFF or Raw. Video cameras usually offer just one native format. This could be WMV, (Windows Media Video), AVI (Audio Video Interleave), MOV (QuickTime movie), or AVCHD (an HD format that’s becoming increasingly popular). Here is a quick roundup of some of the main video formats and what they mean:
- AVI – Audio Video Interleave
- MOV – QuickTime movie
- AVCHD – Advanced Video Codec High Definition
- WMV – Windows Media Video
- SWF/FLV – Shockwave Flash / Flash Video
- MP4/MPEG4 – Moving Picture (Experts Group, v4)
- RM – Real Media
- H.264 – Advanced Video Codec for MPEG4 files (MPEG4 Part 10)
- DiVX/DMF – DivX format
File Sizes
We are all used to capturing stills using the JPEG format, and for video there is MPEG format. HD movies can occupy several gigabytes for a short sequence, so in order to fit it all on a memory card the movie has to use compression. MPEG2 and MPEG4/H.264 are the popular choice. This uses a LGOP algorithm, LGOP standing for Long Group of Pictures. Compressing a still image is relatively easy: just analyse the single picture and compress it. With movies it is slightly more complicated. Movies are made up from sequences of still pictures. In the UK we use 25 frames per second (fps) on our TV sets; in North America they use 30fps (29.97 to be technically accurate). These frames are divided up into Groups of Pictures, generally 12 for a LGOP. The first frame is sampled and then the next 11 frames are made up from the first reference frame, then the process repeats with a new key frame. For most practical purposes this works fine, until you start to pan to capture some fast action, where you may end up with a ‘smeared’ looking sequence. Ideally, a shorter grouping of pictures would be a better solution, though this would result in much larger files. A four-minute sequence captured in Full HD (1920 x 1080) using MPEG2 compression wilL occupy 1 gigabyte (1048MB); the same four- minute sequence without compression occupies 32,457 gigabytes.
Audio
In general, DSLRs regard audio as an added feature with very little importance. This is a little short-sighted as audio is an essential part of any production. Nikon and Canon both use a small mono microphone on the camera body, which annoyingly also picks up any handling noises. The Panasonic GH1 has a stereo microphone on the camera’s prism and a mini plug for an external microphone. The Canon 5D Mk II and the new Pentax K7 also have sockets for an external mic – best for professional recording.
Frame Rates
Video is captured in frames per second (fps), and generally the two popular frame rates are 25fps and 30fps. Both are recognised as TV standard. In Europe and the UK we use the 50Hz PAL TV standard (Phase Alternating Line), which refreshes at a rate of 50 interlaced fields per second (i.e. 25 full frames per second). In North America they use the 60Hz NTSC standard (National Television System Committee) which plays at 29.97 interlaced frames per second. Capturing video at 30fps may not appear to play as smoothly as 25fps on a PAL system due to the refresh rate.
Progressive or Interlaced
You may see that video is captured in either 25p or 50i. The 25p denotes that frames are captured in Progressive mode, meaning that the entire image is captured in a single frame. 50i, Interlaced, means that each frame is actually made up from two adjacent frames. The first frame captures the odd lines and the second frame captures the even lines. The two frames are then seemingly combined one after the other to produce an interlaced frame. Interlaced video produces smoother movement in action but can also cause a tearing effect in faster movement. Progressive or Interlaced has no bearing on resolution, only the frame rate.
Burn a DVD
Once edited, burning a DVD (or Blu-ray) of your video onto a recordable (R) or rewriteable disc (RW) is an ideal way to watch back your footage, and it makes a great gift for friends and family. The option to add chapters and utilise your player’s remote control to navigate through footage is an extra bonus too. It’s a simple process that is free using Windows DVD Maker, or alternatively iLife 09 (£70) for Mac contains the iDVD application. Open source programs such as DVDFlick offer a viable alternative that won’t cost you a penny either. It’s worth remembering that DVD doesn’t support HD footage, whereas Blu-ray does – though recordable Blu-ray discs and players don’t come cheap as yet.
Media Players
 What you play your videos back in can make a real difference to the way they view – we’ve probably all seen jumpy motion or nasty pixellation when playing movies on a computer. This can be down to a poor media player not dealing with the file well, or it could be a low-spec machine or power-hungry operating system hogging the CPU’s capabilities. To get the best out of your videos it’s best to playback using a well-established and effective player: among the most popular is Windows Media Player – Microsoft’s own that comes bundled with Windows; Quicktime – Apple’s proprietary program which is native to .mov format but has come on in leaps and bounds to deal with multiple formats; and RealPlayer – one of the first players to allow live streaming of video from the Internet. Also consider the VLC Media Player – it’s extremely quick to load, doesn’t take up much space and runs a huge array of file types, plus lends itself to third-party development for free given its open source status – it also comes high up the recommendation list.
Editing Video Files
 At first glance, video editing may seem overwhelming. However, as with anything, once you get the hang of how the system works, dropping clips onto a timeline becomes very easy. You can apply more or less the same colour correction tools that are found in Photoshop or Paint Shop Pro, such as Colour Balance, Hue/Saturation, curves and so on. Add in a music track and then export the entire production to a DVD or YouTube. Popular start-up applications include iMovie (Mac), Adobe Premiere Elements, and Corel Video Studio X2, among others. For the user who doesn’t want to become involved with video editing, then you can simply link up the camera to a domestic TV set via the HDMI output and watch your movie clips from an armchair.