Two easy ways to auto correct for colour casts in Photoshop
While it is relatively easy to correct colour casts in Camera Raw, it can still be necessary to use more traditional Photoshop methods to colour scanned or JPEG images. In this feature I wanted to show you two easy ways to auto correct for colour casts in Photoshop with examples of the types of images that can benefit from this kind of treatment.
Auto image adjustments
The Image > Adjustments menu contains three auto image adjustment tools that are designed to provide automated tone and color correction: Auto Tone, Auto Contrast and Auto Color. The Auto Color adjustment provides a combination of Auto Contrast to enhance the tonal contrast, combined with an auto color correction that maps the darkest colors to black and the lightest colors to white.
If you open the direct Levels or Curves dialogs you will see an Options… button just below the Auto button. Click on this and you will see the Auto Color Correction Options shown in Figure 1. If you are using a Levels or Curves adjustment layer, Option/Alt-click the Auto button to open the Auto Color Correction Options dialog. The algorithms listed here match the auto adjustments. Enhance Per Channel Contrast is the same as Auto Tone.
Enhance Monochromatic Contrast is equivalent to Auto Contrast and Find Dark & Light Colors is the same as Auto Color. But notice there is also a Snap Neutral Midtones option. When this is checked, a gamma adjustment is applied in each colour channel which aims to correct the neutral midtones as well as the light and dark colors. A clipping value can also be set for the highlights and shadows and this will determine by what percentage the endpoints get automatically clipped.
Figure 1 The Auto image adjustments can also be accessed when you click on the Options… button in the direct Levels or Curves dialogs, or Option/Alt -click the Auto button in the adjustment layer dialogs. If Snap Neutral Midtones is selected, Auto Color will neutralize these too. You can also customize the Clipping values to determine how much the highlights and shadow tones are clipped by the image adjustment.
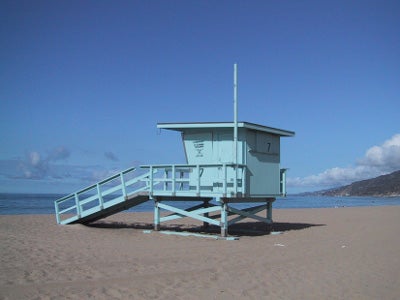
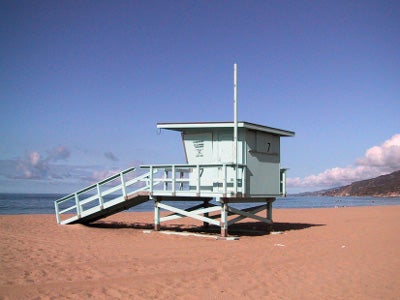
Figure 2 This shows a comparison between an image with a colour cast and a version that has been corrected using Image Adjustments Auto Color. The Auto Color option maps the darkest and lightest colors to a neutral color (note if the swatch colors shown in Figure 1 have been altered, you may see a different result).
Match Color auto adjustments
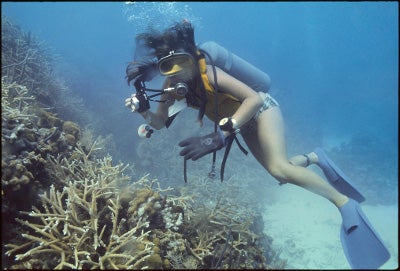
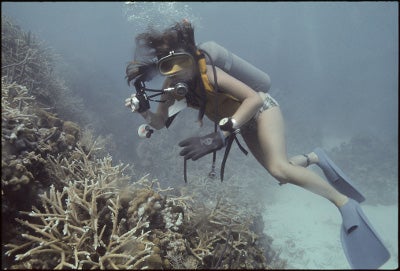
The Match Color image adjustment can also function as an auto colour correction tool for images that have a heavy colour cast. In the following example you’ll see how Match Color can be very effective at removing a deep blue/cyan cast from an underwater photograph. You can always try using the Image > Adjustments > Auto Color adjustment in Photoshop to remove such casts, but Match Color’s ability to neutralize tricky subjects is usually more impressive. It’s not just the fact that a Match Color neutralize is generally more effective, you also have the ability to use the Image Options sliders to moderate a Match Color neutralize adjustment. For example, if you use Match Color to auto-correct images with heavy casts this can result in images that have less overall saturation. You may therefore sometimes want to adjust the Color Intensity in the Match Color Image Options section in order to compensate for the lost saturation. In addition to this you can also adjust the luminance of the image and fade the overall adjustment.
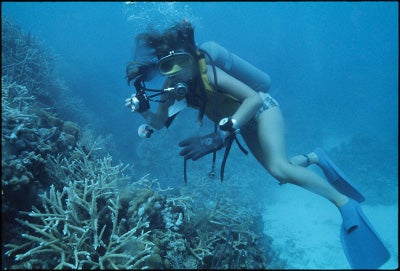
Step 1. The Match Color image adjustment is a useful image correction tool in its own right. In this extreme example, I used the Match Color adjustment to remove the strong blue/cyan cast seen in this photograph taken by Jeff Schewe.

Step 2. To do this, I went to the Image menu, chose Adjustments > Match Color and checked the Neutralize option. This helped remove most of the colour cast in the photograph.

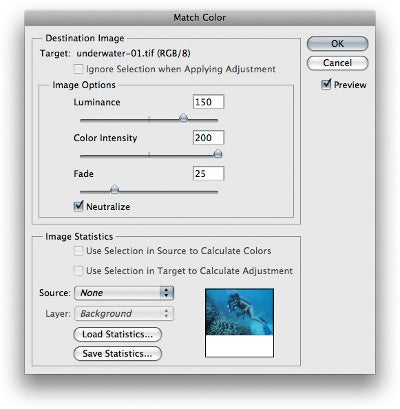
Photo: © Jeff Schewe
Step 3. Step 2 did quite an impressive job of removing most of the deep blue colour. However, I felt that it would be useful to moderate the adjustment slightly. First of all, I raised the Luminance to +150%. This essentially lightened the photo. Since the photograph had now been neutralized, there wasn’t a awful lot of colour saturation left in the image, so for this reason I raised the Color Intensity to +200%. Lastly, I moved the Fade slider slightly to the right in order to fade the neutralize adjustment and restore a little more of the original colour. The final result is a picture that still looks like an underwater photograph, but with more of a neutral colour feel and perhaps a little closer to how the photographer, Jeff might have perceived the original scene when he shot this picture.


