Master off-camera flash with your Canon DSLR. Using off-camera flash can really improve your portrait images, and it’s not as tricky as it may appear
For most amateur photographers, the term ‘off-camera flash’ is enough to bring them out in a cold sweat. As the name suggests, this technique is the act of firing a flashgun off-camera to achieve professional, studio-style results just about anywhere. Most commonly, it is used within portraiture, as the small flashguns produce a fairly narrow spread of light that works well for smaller subjects. However, it has been known for some photographers to connect multiple off-camera flashes to light larger subjects, such as cars and large groups of people.
Off-camera flash has a number of practical advantages that can be really useful, particularly in tricky lighting situations. When shooting indoors, ceiling lights can often cast a dim and unflattering light on to your subject, but a simple off-camera flash set-up allows you to take control of the light and create much more pleasing results.
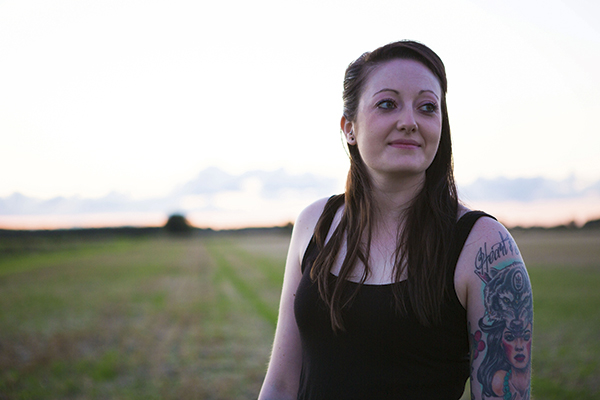
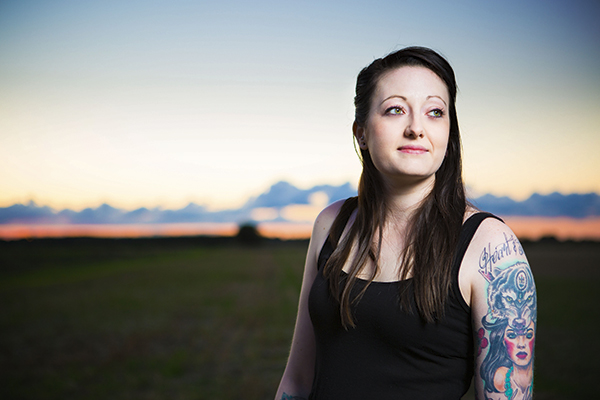
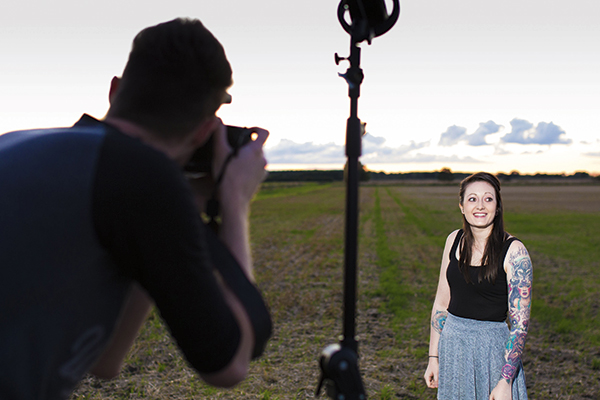
Using off-camera flash is an effective way to achieve studio-style portraits while shooting out in the field.
Off-camera flash also has its advantages when shooting outdoors in bright sunlight, as it can be used as a type of fill-in flash to achieve more attractive portraits. Simply face your subject so that the sun is positioned directly behind them, then use your off-camera flash to light your subject from the front for a perfectly balanced exposure.
As off-camera flash requires a little bit of set-up and some prior knowledge in order to use it correctly, it’s sometimes viewed as being too technical or difficult for rookie photographers to try their hand at – this couldn’t be further from the truth. If you’ve ever fancied trying out this fun and effective technique then you’re in luck because over the next few pages we’ll be delving straight in and showing you everything you need to know to get started taking your very own off-camera flash portraits.

So, what gear do you need? Well, the obvious piece of kit that’s top of the list is a flashgun. Canon currently offers a host of flashgun models in its Speedlite range, starting at the compact 90EX (£120), all the way up to the high-end 600EX-RT (£449). In theory, just about any model of flashgun will work, though ideally you’ll want to choose one that offers full manual control as this will allow you to easily adjust the strength of the flash while firing it off-camera. The Canon Speedlite 430EX II is a good place to start, as it offers full manual control, high power output and has an affordable price tag of £199. If you have a little more money to spend, you could always look to splash out on its sibling, the 430EX III-RT (£250), or even its big brother, the 600EX-RT, which both include a built-in radio trigger system (hence the RT in their names) that allows them to connect wirelessly to other RT compatible flashguns and fire simultaneously. This is a really useful feature, particularly if you’re planning on purchasing and firing multiple flashguns off-camera.
Aside from a flashgun, you’ll also need a means of being able to fire it once it’s away from your camera. There are a few ways of being able to achieve this. The first is by using a TTL cable, which attaches from the top of your camera’s hotshoe to the base of your flashgun. Once the shutter button is fully depressed, the flashgun will operate just as it would if it was sat directly on top of your camera, but just with the freedom of being able to move it to other positions external to the camera. If your flashgun has a TTL metering mode, then using a cable will also allow you to use this to let the flashgun automatically adjust its power output to suit the camera settings. That having been said, one obvious limitation to a cable is that the position of the flashgun will always be restricted by the length of the cable itself.
Go wireless
One alternative to using a cable is to rid yourself of wires completely and opt for a set of wireless radio triggers. Although these may sound quite technical, they’re actually very straightforward to use. There are two parts to the trigger set, which includes the transmitter and the receiver. The transmitter is clipped to the hotshoe port on your camera, while the receiver attaches itself to the base of your flashgun. Once the shutter button is fully depressed, the transmitter will send a radio signal to the receiver, which will in turn fire the flashgun. Unlike a cable, however, most basic trigger sets are not able to transmit a TTL signal, so you will be forced to manually meter and control the flashgun’s power output, though this is a small price to pay for the added manoeuvrability and flexibility that is afforded by the wireless system. It’s also worth bearing in mind that if you have plans to use more than one flash off-camera, then most wireless triggers allow you to do this easily by simply purchasing additional receiver units.

Once you’ve purchased a flashgun and a means of firing it off-camera, you’re going to need a suitable light stand so that you can easily position your flash. Luckily, light stands are reasonably inexpensive and can often be bought as part of a starter package, such as the Westcott Collapsible Umbrella Flash Kit (£65), which includes a light stand, a bracket to hold the flashgun in place and a 105cm umbrella diffuser that can be neatly attached in front of your flash in order to help spread the light more evenly for softer, more flattering light.
It’s worth noting that if you’re planning on shooting outdoors with the umbrella diffuser attached then it’s a good idea to source some way of anchoring the stand in place (for example, a heavy weight or a large water bottle placed at its base will work well), because this will help to prevent your stand from being blown over in the wind and potentially damaging your flashgun.
Similar to firing your flashgun on-camera, when using off-camera flash you’ll still need to consider your flash’s sync speed. Using a faster shutter speed than the flashgun’s sync speed will result in under-exposed barring across your image, also known as banding, which is caused by the camera’s shutter opening and closing more quickly than the flash is able to fire. Usually flashguns have a sync speed of around 1/160sec, so you simply need to make sure that your shutter speed doesn’t exceed this limit to avoid any problems.
High sync function
Some flashguns will feature a high-sync flash function that allows you to use much faster shutter speeds without incurring banding; however, this mode will not work with most budget triggers. If you want to take advantage of this feature, then you’ll need to invest in a set of high-end triggers that are high-sync flash compatible, and will allow you to use this option for greater flexibility when it comes to the exposure settings.
Finally, something that is often overlooked by photographers when first starting out with off-camera flash techniques is the importance of having a healthy stockpile of batteries. Chances are that both your wireless triggers and flashgun rely on disposable batteries in order to work, and the more you use them the quicker they will eat through batteries’ charge.
The simple solution to this is to make sure that you always have a batch of fresh cells in your camera bag at all times to prevent you from being caught short when out in the field, as well as disposing of depleted batteries to avoid getting used and new ones mixed up.
Step by step – How to set up your camera kit fora off-camera flash images
STEP 1
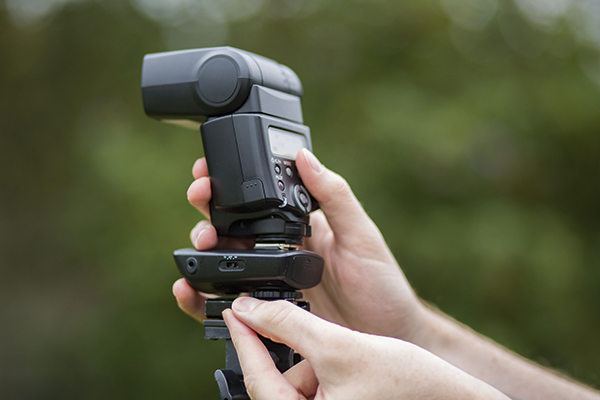
Attach the wireless triggers
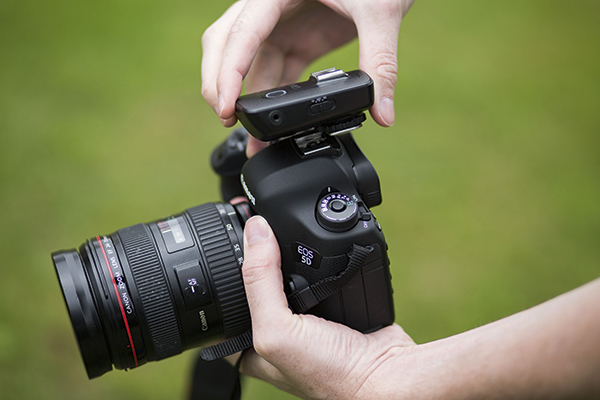
Start off by attaching the transceiver to the top of your camera’s hotshoe port, then attach the receiver to the bottom of the flashgun. Make sure that the transmitter and receiver are switched on and ensure that they are both set to the same frequency channel, otherwise they will fail to fire.
STEP 2
Turn on your flashgun
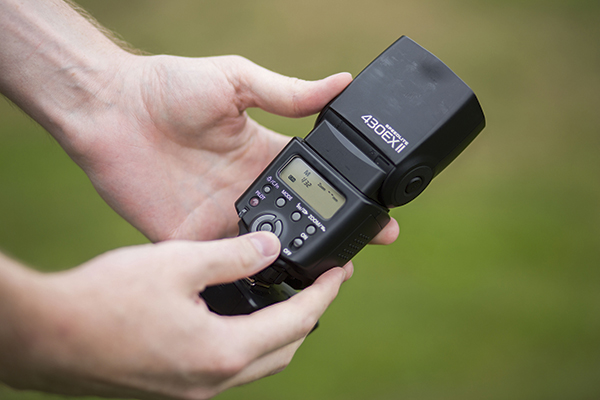
Switch on your flashgun and set it to full Manual mode by pressing the Mode button until you see ‘M’ displayed. Press the Sel/Set button (you should see the power output start to blink), and then use the arrow buttons (or the scroll wheel if you’re using a high-end model) to set the output to 1/32 power.
STEP 3
Position your flash
With your flashgun all set up, go ahead and attach it to your light stand. You’ll need to position your light stand so that the flashgun is directed at your subject but is also not so close as to dazzle your subject when it fires – about three to four paces away from them should be fine.
STEP 4
Switch to Manual mode
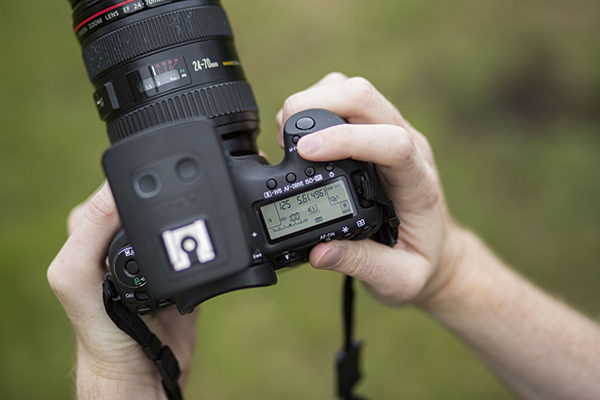
Turn on your camera and then set it to full Manual mode (shown as M on the Mode Dial). Now, set the shutter speed to 1/120sec and set the aperture to a mid-range aperture around f/5.6. Also, set the ISO to the lowest possible setting (usually ISO 100) to ensure optimum image quality.
STEP 5
Take a test shot
Compose, focus on your subject and take a test shot. Review the shot by pressing the Playback button. If your subject is too bright, reduce the power output on your flash to 1/64 power. If they are not bright enough, increase the power instead to 1/18 power. Take another test shot and adjust again if needed.
Using light modifiers
The most common light modifiers are umbrellas and softboxes. Umbrellas are cheap and portable and there are two types. Reflective ones have a reflective silver covering that bounces light off the umbrella and back onto the subject. Shoot-through ones have a white translucent fabric covering that softens the flash as it passes through. Softboxes soften the light by forcing it through one or two layers of material. They are better at preventing light from spilling out around the room than an umbrella.
Underexposing ambient light
If you’ve ever searched the internet for ‘off-camera flash’ then you’re probably familiar with the images of dark and dramatically textured clouds with the subject brightly lit by off-camera flash. This technique alone is one that often inspires people to learn about off-camera flash, and it’s actually relatively simple to pull off. The idea is that you purposely underexpose the shot for the ambient light, which will enable you to capture bags of detail in the sky and clouds, while the off-camera flash is used to keep your subject brightly lit.
To do this, set up your camera as per our step-by-step, but instead of using a mid-range aperture, set the camera to around f/11 – this will cause the shot to become underexposed. Now, boost the flashgun’s power output to 1/2 power to compensate. It’s worth noting that this technique will work best on cloudy days where the sunlight is less intense.