
Here is a subject that I have to say only recently caught my attention when a fellow photographer pointed out to me that some of the latest high-end digital SLR cameras allow you to make micro focus calibration adjustments. This is something that had never occurred to me before since I had always assumed both the manual and automatic focusing to be fairly accurate on such cameras. However, as I was about to find out, this isn’t necessarily always the case.
There are two issues at stake here: one is the accuracy of the auto focus detection mechanism in estimating the exact, correct focusing distance to produce a perfectly sharp image on the sensor. The other issue is to do with the accuracy of the focus screen used for manual focusing and whether the light path distance to the glass screen is exactly the same as that to the sensor. I am reminded here of what happened to a photographer’s assistant who accidentally broke the ground glass screen to his boss’s 5×4 plate camera. Not wanting to incur the wrath of the photographer (who was known to have a nasty temper), he set about finding a replacement screen and fixed it himself. The only problem is he got caught out, as he’d put it in the wrong way round with the ground glass facing outwards!
Anyway, I digress, in both these circumstances if there is even just the slightest amount of deviation in the physical distance for the screen, the sensor or the lens itself, this can result in minor fluctuations in focusing from the assumed factory standard. The main variable here is the lens itself and it is interesting, if not shocking, to discover just how much variance there might be between an individual lens and the ‘assumed’ lens focusing behaviour.
Enter the LensAlign® system, a calibration tool designed by Michael Tapes that provides a method for calibrating the lens focusing in those digital SLR cameras that provide a custom auto focus calibration setting control. These include the latest Canon EOS 1D MkIII and 1Ds MkIII, 5D MkII, the Nikon D3, D3X, D300 and D700, plus several more. Now I admit I do happen to know Michael, but my purchase of LensAlign came from a genuine desire (and need) to calibrate the lenses I shoot with and I have to say I’m glad I did, because it has revealed significant focusing errors with a couple of the lenses I use regularly.
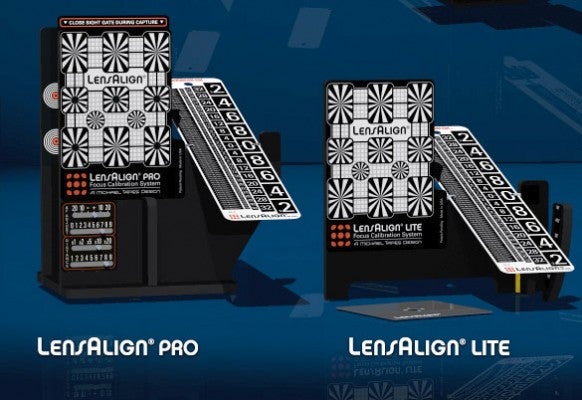
Fig 1. The Lens Align Pro and LensAlign Lite calibration tools.
Here is how it works. The LensAlign calibration tool comes in two versions: Lite and Pro. Both offer the same degree of accuracy, but the pro version is larger, more robustly built and can be adapted to take a long lens ruler adapter. Basically, you first of all have to set up the LensAlign assembly so that it is aligned straight on to the camera and at an optimal distance from the chart of x25 the focal length of the lens to be tested. There are instructional videos on the website that show you how to do this and the tool is cleverly designed to allow you to check the alignment by spying through a tiny aperture at the back as well as when looking through the camera lens itself. Once aligned for the camera body and lens combination you wish to test, you set the lens aperture to its widest setting and simply let the auto focus system of your camera focus on the main target and take a picture. Now, because the ruler scale is positioned at an angle to the camera, when you examine the captured image in close-up, you can use the numbers on the ruler scale to help determine whether the focusing system of your camera is focusing correctly (i.e. when the sharpest detail on the ruler scale is at the zero point).
If it turns out that the camera and lens combination is not focusing correctly, you can now work out if the error is due to front or back focusing. Armed with this information, you then need to locate the Auto Focus calibration setting from the camera menu and try making a calibration adjustment for the lens you are currently shooting with. Shoot another test and see if this improves the focus accuracy. Once you have worked out the appropriate level of correction that’s it, you can move on to test with the next lens in your camera bag. Providing you make the focus calibration adjustments on a per lens basis, the camera stores this information in its internal memory and will automatically know in future just how much correction to apply to the auto focus for whichever lens you choose to shoot with.
As I say, I was both impressed (and shocked) at what I found. One of my lenses required the maximum amount of front focusing correction available in order to achieve optimum sharpness (see Figures 2 and 3). The difference between the before and after is quite staggering. Bear in mind here that this test is designed to show up the focus accuracy at the widest lens aperture. When shooting normally it very often won’t matter if the focusing is slightly out since at least some points in the photo will be at maximum sharpness and at smaller apertures the depth of field will increase to compensate and bring more points into apparent sharp focus. However, it is reassuring to know that for those times when pin-sharp focus is required at wide apertures, there is a way to ensure the focusing is as spot on as possible.
Figure 2 (below). Here you can see a close-up view of an initial lens
test in which the auto focus mechanism was clearly off target and front
focusing.
Figure 3. In this example you can see how the LensAlign target was captured after I had applied an auto focus calibration adjustment.