
The Great Indoors: Scanner Photography
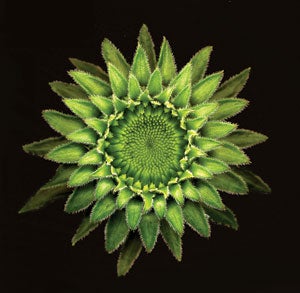
Scanner Photography (Right: Echinacea bud right by Rodd Halstead) Modern photographic scanners are capable of whole lot more than just creating a digital archive of your old film prints, as Rodd Halstead explains…
Modern photographic scanners now boast resolutions as high as 4800 dpi, which in essence, means they can be employed as extremely sharp and powerful ‘digital’ cameras.
Rodd Halstead is one of a growing number of photographers to have discovered scanner photography, although as Rodd himself admits, it was an avenue of photography he discovered purely by accident.
 ‘On Christmas Day 2003 my younger daughter received a new Barbie Doll’ he explains ‘Out of curiosity or perhaps even boredom we put the doll on the scanner bed, covered it with a piece of white paper and scanned it. I was blown away by the results the photograph had incredible sharpness, and great colour and lighting. The biggest surprise, though, was the depth of field, which was as good as most camera macro lenses.’ Why not give it a go yourself, by following Rodd’s instructions below?
Step by Step
SELECT THE RIGHT EQUIPMENT
It is important to use a ‘photo scanner’ for this kind of high-quality optical work. I use an old Epson Perfection 2450 Photo scanner. Scanners like the Epson Photo series have a xenon lamp, and use a mirror to focus the image on to a CCD scanner, similar to a digital camera. Anything comparable should work fine.
 CLEAN EVERYTHING
To get high quality images without dust, streaking and other defects, you will need to wipe down the glass plate with a lint-free cloth (or paper towel) with a computer screen cleaning fluid. It will also help to dust off your scanned object.
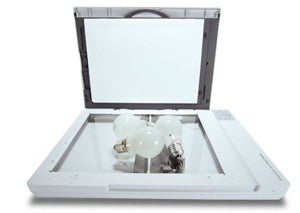
CHOOSE A SUBJECT ( Right: Lightbulbs right, by Scott Lewis) While it is possible to capture objects up to an inch away from the scanner bed, I prefer to work with objects where the area of interest will be within 1/2 inch from the glass. Working within this distance will result in scanner photos with more even lighting and focus.
POSITION AND SCAN
Place the object on the glass and scan with your scanner’s ‘Color Photograph’ image setting. A black background can be obtained by scanning in a dark room with the object uncovered. I have also used white (matte photo paper) to cover a small object, which results in a white (or grey) background.
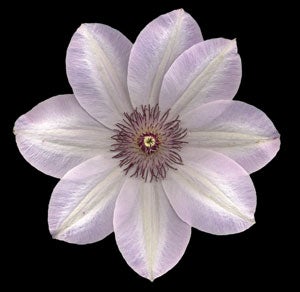 Scanner Subjects (Right: Clematis Flower right by Rodd Halstead)
Here is a list of 3D objects that I have successfully imaged using a scanner.
1. Flowers, especially blossoms that are relatively flat. My all-time favourite is the Clematis flower.
2. Ferns, leaves, bark and other natural materials.
3. Fruit, especially fruit cut into cross-sections and placed on the scanner bed.
4. Rocks, gems and jewellery.
5. Framed photographs (even when covered with glass). As long as the underlying image is relatively flat and not too shiny, this technique is a good way of copying old family photography.