
Photoshop Facial Surgery: Page 2

PROJECT 2: Identify and Remove or Soften Hard Lines and Wrinkles from the Face.
The most basic of all the retouching tools is called the Clone Stamp tool (or sometimes the Rubber Stamp tool). This feature selects and samples an area of your picture and then uses these pixels to paint over the offending marks. It takes a little getting used to, but as your confidence grows, so too will the quality of the repairs and changes you make.
There are several ways to use the tool. For starters, it acts like a brush, so changing the tip size allows cloning from just one pixel wide to hundreds across. You can also change the opacity in order to produce a range of subtle clone effects. It can be used in conjunction with any one of the options from the Blend menu and, most importantly, there’s a choice between Cloning aligned or non-aligned with the sample area.
Select Aligned and the sample cursor will follow the destination cursor around keeping a constant distance between the two. When the Aligned option is unchecked the sample cursor starts where you left off with all ensuing paint strokes. Both choices have their advantages.
All ethical issues aside, Photoshop is a great tool for removing, or at least making less pronounced, a variety of unwanted portrait elements. Despite the fact that skin blemishes and wrinkles are completely normal for most of us, photographers are constantly asked to retouch these features in portrait photos. Even my 12-year-old daughter’s school photo order form has a tick box for ‘Minor retouching of problem areas’. There are four tools in the latest version of Photoshop that can be employed to help. In this step by step I will use the most basic tool – which is common to most versions of Photoshop and Photoshop Elements – the Clone Stamp, to strip back the years in the example portrait.
|
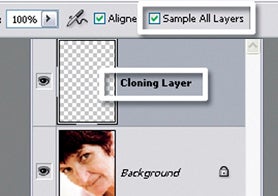
Step 1 – Clone Sampling The Clone Stamp tool works by sampling a selected area and pasting the characteristics of this area over the blemish, so the first step in the process is to identify the areas in your picture that need repair. Then make sure that the image layer you want to repair is selected. Some photographers create a new layer and then apply their cloning to this layer. If this is your approach then also ensure that the Sample All Layers option is selected. |
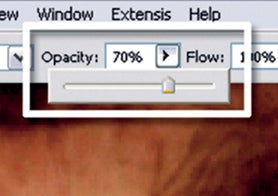
Step 2 – Locate Areas Next locate areas in the image that are of a similar tone, texture and colour to the parts that need fixing. It is these areas that the Clone Stamp tool will copy and then use to paint over the model’s wrinkles. At this point you can also alter the transparency of the cloning action by adjusting the Opacity slider in the tool’s options bar. Anything less than 100% will let some of the original texture through the cloned areas. |
|
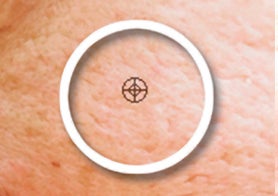
Step 3– Sample Point Now to select the area to be sampled, or the sample point. Do this by holding down the Alt key (Win) or the Option key (Mac) and clicking the left mouse button when the cursor (now changed to a crosshair) is over a part of the image that suits the area to be repaired. With the sample point selected you can now move the cursor to the area to be fixed. Click on the blemish and a copy of the sample point area is pasted over the mark. Continue to click and drag to repair more areas. |
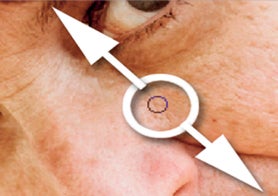
Step 4– Soft Edge You may need to reselect your sample point if you find that the colour, texture or tone don’t match the surrounds of the blemish. You can also change the brush size and hardness to alter the characteristics of both the sample and stamp areas. A softer edge helps blend the edge areas of the newly-painted parts of the picture with the original image. |
Top Tip
A face totally devoid of creases doesn’t look real. To bring a bit more plausibility back into your work choose Edit > Fade immediately after using the Patch tool. With this feature you can change the opacity of the retouching changes that you have just applied, allowing you to bring back just the hint of a crease line to an otherwise unrealistically smooth face.