
John Freeman’s Guide to Slow Shutter Speeds: Page 2
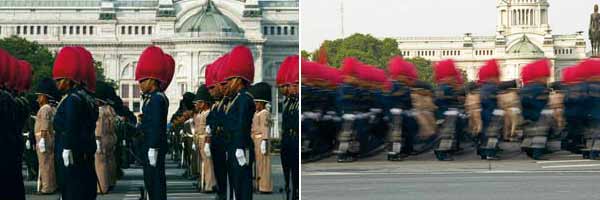
On Parade
For this picture of marching soldiers I placed the camera on a rigid surface (I used a wall but I could have used railings, a parking meter or a traffic bollard, for instance) and chose a shutter speed of 1/15sec. This meant that the soldiers have come out very slightly blurred but has given the distinct impression that they are on the move, whereas the shot taken at 1/125th second (left) has a static quality and looks boring by comparison.
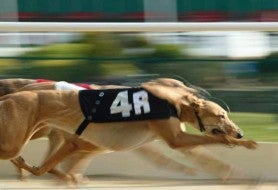 Panning
If you use a fast shutter speed when photographing a moving subject the picture will appear to be quite static because the action will be ‘frozen’. In certain situations this can mean that it is difficult to see whether the subject is moving or is standing still. A far better technique is to pan the camera and use a slower shutter speed, such as 1/60sec. You then move the camera (pan) in line with the moving subject, then take your shot when it is directly in front of you. The result will mean the subject is sharp but the background is blurred. If however, the subject has vertical movement when you are panning the camera in a horizontal direction, it too will be unsharp. This vertical movement can be seen in the dog’s legs, and adds even more to the impression of speed and action than if everything had been recorded pin-sharp, which would have been the case had I been using a fast shutter speed.
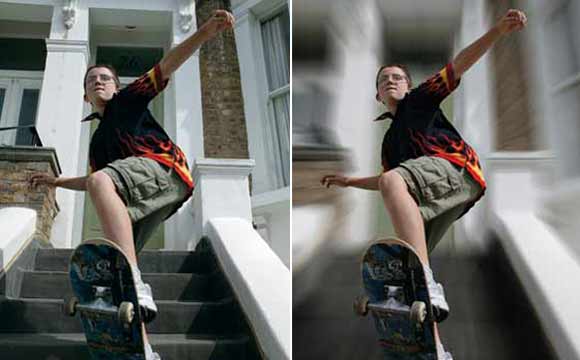
How to Simulate Motion in Photoshop
The effect of movement can be easily achieved on your PC in Photoshop in just a few steps. The principle behind the technique is to blur the image with the motion blur filter and then restore the focal subject’s sharpness, creating the illusion of a speeding background.
Step One
With your image open, draw a path around your focal subject that you wish to retain as sharp. Make sure that you get in tight around the edges and don’t miss out bits.
Step Two
Make the path a selection from the paths palette and then copy and paste the subject onto a new layer.
Step Three
Hide the new layer for a moment. On the original layer, use the clone tool to erase as much of the focal subject as possible. (This is because when the blur filter is applied, we don’t want any of the focal subject seeping out into the image.)
Step Four
Select the motion blur filter from the filter menu. In this example we chose Radial/Zoom. Apply the filter to the entire image.
Step Five
Reveal the top layer containing your focal subect, use the Hue & Saturation command to make final colour tweaks.