
Add motion to your photographs in an instant with this simple but effective technique using your DSLR. Or, if you've not got the camera, we show you how to create a zoom burst in Photoshop too...
Create a Zoom Burst
 With a zoom lens attached to your DSLR it’s possible to move through the zoom range during exposure. The resulting image – known as a ‘zoom burst’ – will generate blurred lines that add a sense of movement and impact to your shot. Get creative and this can add that extra layer of depth to your photography and, when used in the right situations, can really bring life to a subject.
Photographing at the races, rushing businessmen bustling through the streets – these shots don’t always require pin-sharp images to get their message across. Experimenting with a zoom burst can give your shot that different angle. Or, if you’re feeling more creative, mount up on a tripod for considerably extended exposures – in low light this provides the opportunity to create superbly abstract results. The sky’s the limit, it all just takes a little practice…
Kit you will need
For a basic zoom burst you’ll need nothing more than a DSLR with a zoom lens, plus a relevant subject. Initially it’s best to practise on any given subject as it’ll take some time to get things looking how you want them, and subtle differences will have significant impact. For those looking to imitate the process, Photoshop offers the effects to create convincing results from a usual, sharp still image.
We show you the basics, the more advanced techniques and, should you be looking to side-step the shooting process, the Photoshop version too.
Shooting
Exposure
 In order to get notable movement in your shot, the exposure needs to be increased, longer than it would usually be for a handheld shot. 1/8th second is about the shortest exposure, with 1/4th second or similar producing good handheld results. Set your camera to shutter priority (Tv or S) and experiment with different exposures for varying results. When shooting handheld you can’t guarantee straight blur lines however, but this can add to the effect.
Focus & exposure lock
 A moving subject can cause difficulty with focus, but one-touch autofocus can be a great help. A stationary subject means you have more time to focus. In both cases selecting manual focus eliminates the possibility of the focus point changing during exposure, though may not always be practical in use. For best results, lock the exposure reading on your subject using the camera’s AE-L function, or try using Manual exposure.
Get zooming
 With your zoom set to its longest focal length, placing the subject centrally for best framing, pull the zoom back to the short end as you fire the shutter. If you have a rotating ring type focus then avoid ‘hitting’ the widest point as this can cause excessive, irregular movement toward the end of your exposure. Not using the full zoom range can create different results with shorter blur and tighter framing, so try faster and slower zooms for effect.
Post production
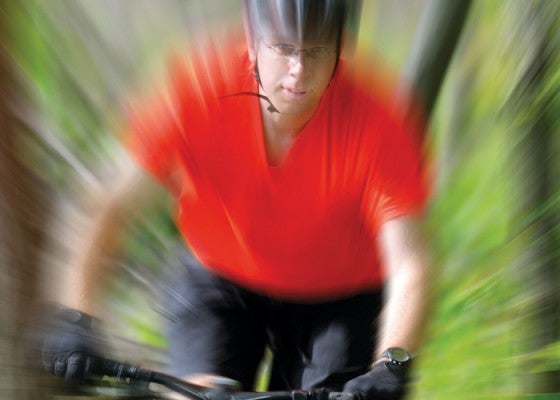
 Adding a zoom burst in post-production is one way to offer a fix to slightly soft images, or just to add greater dynamism to your shot. Photoshop offers the tools to quickly and simply add a convincing zoom burst type effect, using the Radial Blur filter. Plus, with the inclusion of layers, it’s possible to keep the centre section sharp using the eraser tool or mask. Here’s how we created our main image on the left.
Radial Blur
Duplicate your original layer and work on the copied version. Apply Filters > Radial Blur to open the tool you’ll need to apply the effect. Ensure that the ‘zoom’ checkbox is selected for a zoom-burst like quality. Adjust the slider to alter the severity of the effect – subtlety is key. It’s also possible to drag the centre point, but avoid this as zoom bursts shot using a camera can only have centred focal points – anything else won’t look ‘real’.
Masking
 Convert your copied, blurred layer to a Smart Object by holding Ctrl and clicking the layer, then selecting Convert to Smart Object. Next click the Add Vector Mask button at the bottom of the Layers panel (Layer > Vector Mask > Reveal All). Your blank white mask can be gently brushed with a black brush (around 8-15% airbrush) to reveal the discreet detail of your original layer below. If you overdo your brushing, simply brush back in white.
Extra kit
Add a tripod
 With a tripod added to the mix, maintaining very straight, direct blur lines is possible, unlike when holding by hand. Perfect for setting up a well-framed shot with regularly passing subjects, such as at a race course. It also opens the door for more experimental long exposures – try exposures at night (where lights are present) with an exposure of a number of seconds and you needn’t rush through the zoom. It’s possible to slowly turn the entire zoom range or, for a different result, zoom in segments while pausing between to keep sharp sections in multiple areas of the exposure. The result is the same subject fixed at multiple points through the final image. Practice with all sorts of exposures and it’s possible to produce some great abstract results.
 Use a flash
When the flash is fired – be that on-camera or even remote flash – it will ‘freeze’ your subject in the frame at that given moment, which can add pronounced sharpness. It’s important to slow sync your flash at the correct curtain depending on whether you’re pulling from the wide or tele end to start with too, otherwise bizarre superimposed images inside the blur may occur. Practice makes perfect for what will and won’t look right – experiment to see what you can come up with.