
With the introduction of Photoshop CS2 came Smart Objects - the dawn of nondestructive editing for your photos, JPEG or otherwise. We show you non-destructive sharpening...

Photoshop – from version CS3 and up – includes a new filtering option called Smart Filters which allow you to apply a filter to any of your images non-destructively. Based upon the Smart Object technology first introduced in Photoshop CS2, Smart Filters now enable image-makers to change their photographs with any of the many options listed under the Filter menu and then revise the filter settings used, or even remove the effects totally, later.
 Unlike the old way of applying filters where the pixels in the original image were changed in the process, the Smart Filter workflow protects the photo and applies the filtration changes virtually. The image that we see in the Photoshop workspace is a preview of the photo with the filter effects applied – but rest assured, the original pixels are not changed in any way. Because of the way that the original photograph is protected, this type of enhancement is often referred to as non-destructive.
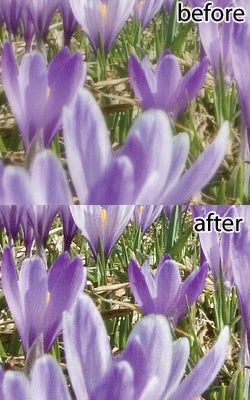
We see how Smart Filters can underpin a non-destructive JPEG sharpening workflow in Adobe Photoshop:
What are Smart Objects?
Smart Objects first appeared in Photoshop CS2. Using Smart Objects you can store vector, Raw and bitmap files (photos to you and me) in an open document and maintain the integrity of the files throughout the editing process. Think of the technology as embedding one file within another. The embedded file is the Smart Object. It can be edited in its original form or non-destructively as part of the document it is embedded in.
For example, when placing a Raw file in Photoshop it automatically becomes a Smart Object and is represented in a single Smart Object layer. The picture can then be transformed and edited like any other picture part in the document. But the placed photo retains its raw file status and can be edited back in Adobe Camera Raw with a double click of the Smart Object layer.
1: 
First, convert the image layer into a Smart Object, via the entry in the Filter menu, Convert for Smart Filters, or by selecting the image layer and then choosing Layer > Smart Objects > Convert to Smart Objects. Notice that Smart Object layers are signified with a small icon in the bottom left of the entry in the Layers palette.
2: 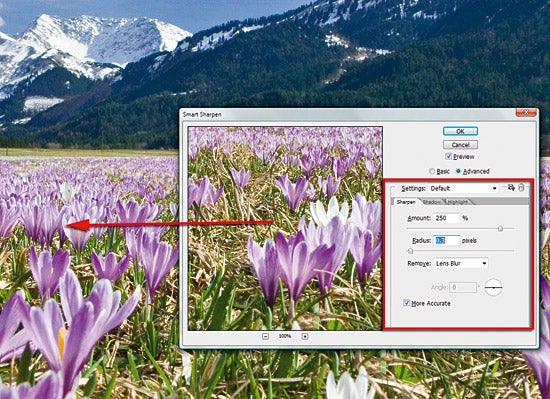
Next, pick the filter you want to apply from the the Filter menu. Most filters have a variety of controls or options that you can use to adjust the effect of the feature. In this case we will use the Smart Sharpen filter. Adjust the settings as you would normally before clicking OK.
3: 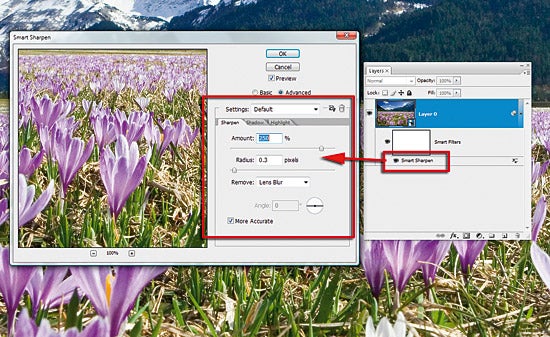
Smart Filters are added as an extra entry beneath the Smart Object in the Layers palette. The entry contains a mask as well as a separate section for the filter entry and its associated settings. Like adjustment layers, you can change the setting of a Smart Filter at any time by double-clicking the filter’s name in the Layers palette.
4: 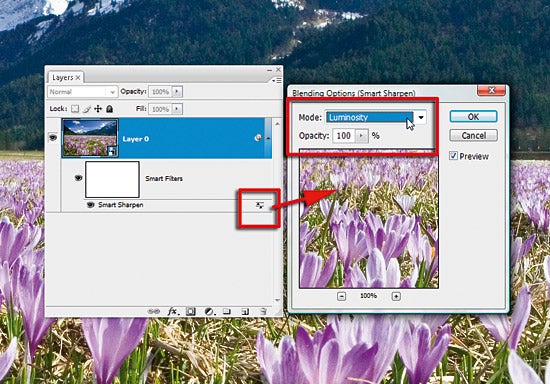
You can also manipulate how the filter is applied. Double-click the Settings icon at the right end of the Filter entry to display the Blending Options dialogue then select a new mode from the drop- down menu. We selected Luminosity so that the sharpening is applied to the details in the image not the colours. You can manipulate Opacity too.
5: 
If you look closely at the layers palette you will also notice that there is a mask associated with the the Smart Filter entry. The mask can be edited to alter where the filter effects are applied to the photo. Just select the mask and then paint with a soft black brush to remove the effects of the filter. In Photoshop CS3 multiple Smart Filters can be added to a photo but they all must use the one common mask. We hope that this will change in the next release, allowing for individual masks for each filter.