
Above: Perfect Viewpoint I chose a low viewpoint for this shot of Sydney’s Harbour Bridge and timed it so that I would be in position well before twilight. Once the sky is completely black this type of shot can look dull and flat.
While it might mean an extra hour in bed in the morning, winter’s longer nights provide countless opportunities for creating exciting and colourful pictures. Whether it is the deep blue sky at twilight, a neon sign or the trails of car lights, the night time can be anything but dark! Digital cameras are perfect for night photography and getting the result right every time, as you can review each shot instantly and check the histogram for faultless exposure.
If I am shooting cityscapes at night my favoured time is what I call the twilight zone. This occurs about half an hour after sunset and lasts for about twenty minutes, so if you want to take full advantage of this period you need to get in position well in advance. The reason I like this time is because the sky takes on a deep blue hue, which offsets the illuminated buildings to best effect. After this time I find that the sky will record as a deep black, which at times might work, but usually I find looks too heavy and isolates the buildings as blobs of light with little detail of their structure. Naturally I use a tripod and cable release so that my shots are pin sharp. Many tripods are not worth the bother and certainly not the money as they can be as stable as handholding the camera; but a good tripod is definitely a worthwhile investment and will be useful for other applications besides night photography. A decent cable release should be purchased at the same time.
 Trails of Light (Right)
I mounted the camera on a tripod together with a cable release and I
used a 4 sec shutter speed. To ensure the shot was sharp I used the
mirror-up facility and the self timer for a smooth shutter release.
SHOOTING LONG EXPOSURES
One of the problems with shooting pictures at night is that longer-than-normal exposure times are required. Many cameras have a shutter setting known as ‘bulb’. When the shutter is set to this it will remain open for as long as the shutter release is pressed. This can drain the battery rapidly so ensure you have plenty of backup. However, since many cameras have shutter speeds up to 30 seconds it is unlikely you will need to use this setting.
Some cameras are better at reducing noise than others, so only by testing will you determine how effective yours will be. When shooting with a DSLR, and having mounted the camera on a tripod and attached the cable release, I then choose ‘mirror up’ mode from the menu. During long exposures the camera can vibrate when the shutter is fired, and this mode prevents this. Usually it works through a double action procedure. Having pushed the cable release half way, the mirror goes up. I then wait a few seconds and push the cable release further and the shutter fires. As a final precaution I also set the self-timer so that there can be no possibility of jerking the camera when the shutter is released. The mirror up will not work on the self-timer setting.
Finally shoot RAW if you can. The reason for this is that you will be able to adjust and improve the image in Photoshop later. If you shoot JPEG important information might be discarded as the camera interpolates the image.
 FLASH AT NIGHT
It is often necessary to use flash as fill-in light when taking
pictures at night: for example, if you are shooting a portrait and the
background is made up of neon lighting. The exposure required in a
situation such as this will be different for the two areas of the
picture, with a longer ambient exposure required for the background. I
always find that if I leave the camera to calculate the flash itself,
it overexposes by about 1/3rd so I shoot with the flash in its manual
mode and decrease the power accordingly. With practice you should be
able to judge your flash accurately and compensate accordingly.
Slow-sync flash is another situation where using flash at night can be
effective. This is where the flash is combined with a slow shutter
speed. This will result in light trails being caught by the ambient
exposure while the flash will freeze other detail. Many cameras have
what is known as second-curtain synchronisation. This means that the
flash fires at the end of the subject movement rather than at the
beginning. This provides a more natural effect, creating a trailing
blur that emphasises motion.
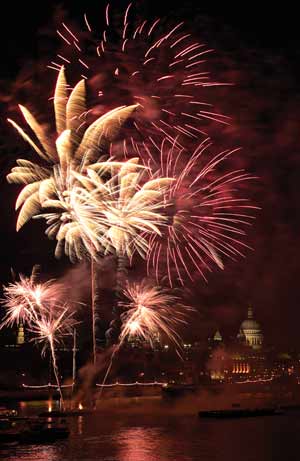
Bulb Setting (Above)
Fireworks make great pictures, but it is all too easy to get them
wrong. By using the shutter on the B (Bulb) setting you will be able to
keep the shutter open for just the right amount of time, as you can
close it as soon as you have the burst of light.