Can Adobe Photoshop Elements 11 improve where Elements 10 left off? We installed the latest version of Adobe's consumer editing software to find out
Adobe Photoshop Elements 11 Review
//
New Features
Unlike Photoshop, which is aimed at professionals who like to concentrate on editing their shots with the finest control, Elements 11 offers more ways to organise and share images. Open the Organizer and the first obvious differences are the larger icons and cleaner looking interface. These changes have made it much easier to navigate, and not only can you view full-screen image previews, it’s easier to manage your photos based on the people in them, where they were taken, or when they were taken. Provided you have an Internet connection, the places view is a great area of the organizer to plot an image or group of images, and if your camera supports GPS, Elements 11 will now recognise the coordinates before automatically adding the images to its integrated Google map.
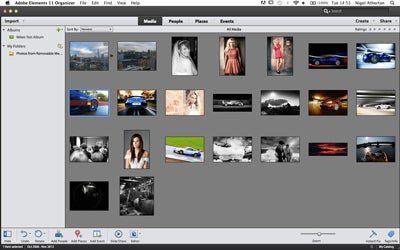
The organizer sports a cleaner looking interface. Most of the main options have been repositioned from the top to a horizontal task bar at the bottom.
Elsewhere in the organizer, the new events view lets users assemble shots based on the date, month and year they were taken. Finding the shots you add to the events area is also made very easy thanks to a new calendar column on the far right of the interface. Not forgetting the importance of sharing images, Elements 11 supports direct uploading to emails and social media channels such as Facebook, YouTube, Vimeo and Flickr. These options are available from the share tab within the organizer, but unfortunately there’s no option to export images directly to Twitter.
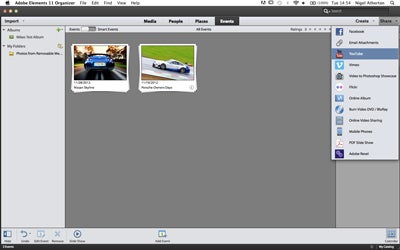
From the top right of the organizer you have various options to export your images directly to social media channels, such as Facebook, YouTube and Flickr.
Switching from the organizer to the full editing area reveals it’s not only the organizer that adopts the new, friendlier looking interface. Icons and palettes are much larger than those in previous versions, which suggests Adobe’s focus is on making sure the interface isn’t a daunting place for inexperienced users, or those who haven’t used the software before.
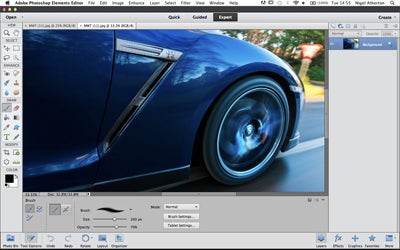
You’ll find the options bar has now been moved to the bottom of the interface in Elements 11. Tools in the toolbox have also been moved into seperate categories, such as View, Select, Enhance, Draw and Modify.
Elements 11 also adopts the three editing modes – Quick, Guided and Expert. These offer different ways to edit your shots based on the skill level of the user, and though there haven’t been any changes to the Quick edit mode, there are more options within the Guided and Expert edit modes.
The Guided edit area is a great place to work if you’re unsure of how to go about achieving certain types of adjustments or effects. It offers a clear explanation of each effect as well as a small thumbnail image to give you a clearer idea of how the final result will look. The four new additions to this edit mode include High Key, Low Key, Tilt Shift and Vignette.
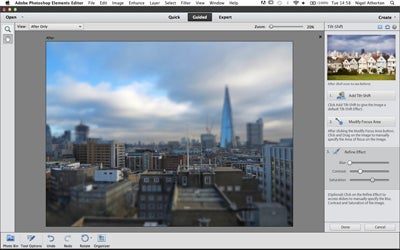
The Guided Edit mode offers thorough descriptions and basic sliders to show users how to apply certain types of effect.
Moving into the more advanced Expert edit mode, there are three new filters, which include Comic, Graphic Novel and Pen and Ink. Each of these artistic filters come with four ready-made presets and sliders to take precise control.
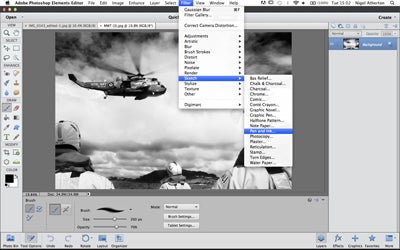
The three new filters – Comic, Graphic Novel and Pen and Ink are found from the Sketch flyout menu.
Elsewhere, Refine Edge has been enhanced to offer all the functionality of Photoshop’s Refine Edge, with the added benefit of a Erase Refinements tool. This works by restoring the original pixel edge if you’re not happy with the adjustments you make using the Refine Radius tool. Adobe has also taken time to refine the Actions command. Actions were introduced into Elements 10, but you can now load pre-made actions from the Internet, but unfortunately you can’t create your own custom folders.
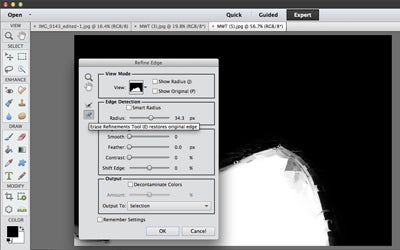
If your not happy with the work you carry out with the Refine Radius tool, you can now use the new Erase Refinements tool to preserve the original selection edge within Refine Edge.


