
Unlike other capture formats (TIFF, JPEG) the White Balance settings are not fixed in a RAW file. This means that you can alter or fine tune the white balance options that you had selected at time of shooting, later at the desktop. For those extreme occasions where the wrong white balance option was selected, you can also remove the setting all together, replacing it with one that is more appropriate. Adobe Camera Raw contains three different ways to balance the hues in your photo.
Pro’s Tip: For the ultimate in white balance control try inserting a grey card into the first image in a series taken under difficult lighting conditions. This can then be used as a known reference point for adjustments made in Adobe Camera Raw.

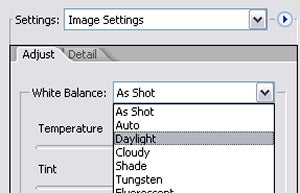
01 With the White Balance Presets you can opt to stay with the settings used at the time of shooting (‘As Shot’) or select from a range of light source specific settings in the White Balance drop-down menu of ACR. For best results, try to match the setting used with the type of lighting that was present in the scene at the time of capture.

02 You can fine-tune your results with the Temperature and Tint sliders. The Temperature slider settings equate to the colour of light in Degrees Kelvin. It is a blue to yellow scale, so moving the slider to the left will make the image cooler (more blue) and to the right, warmer (more yellow). In contrast, the Tint slider is a green to magenta scale.

03 Another quick way to balance the light in your picture is to choose the White Balance tool and then click onto a part of the picture that is meant to be neutral grey or white. ACR will automatically set the Temperature and Tint sliders so that this picture part becomes a neutral grey and in the process the rest of the image will be balanced.
In Photoshop:
To use Adobe Camera Raw simply open a supported raw file from inside Photoshop or Bridge.
In Photoshop Elements:
To use Adobe Camera Raw open the raw file from inside Photoshop Elements.