
Winter Photography Projects: Clean your Sensor and Lenses
47. Clean your sensor and lenses
If you’ve had your DSLR for a few months and have changed the lens a few times, there’s a distinct possibility that you may have some dust on your sensor. You may not have noticed it, but if you enlarge your images quite big on screen you may see out-of-focus dark blobs, formed by dust on the low pass filter in front of your sensor. Here’s a step-by-step guide on how to get rid of the problem.
STEP 1 Choose as clean and dust-free a room as possible. Turn on your camera, go into the set-up menu and select the ‘cleaning mode’ This flips up the mirror and opens the shutter to allow access to the sensor. (Most DSLRs have a cleaning mode. Owners of other cameras should check the manual to see how to do this). If you don’t have this feature, select Mirror Lock, or manual exposure and a shutter speed of 30 seconds. Don’t select the Bulb mode and hold your finger on the button, because if your finger slips and the shutter closes you can damage your sensor, or the shutter).
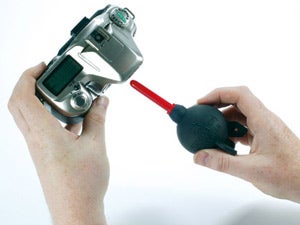 STEP 2 Pointing the camera face down, blow gently into the opening using a brushless blower (such as the Giottos rocket). Compressed air is not recommended as it can spit liquid propellant, and the high pressure can blast dust into unreachable crevices.
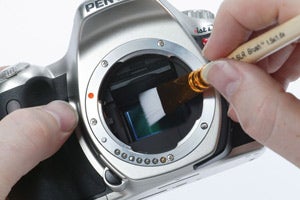
STEP 3 Remove your sensor brush from its protective case, being careful not to touch its bristles. Use the blower to blow a few puffs of air through the bristles. This will increase the static charge on the brush and dislodge dirt.
STEP 4 With the camera still in cleaning mode, gently touch the sensor with the bristles and move across the sensor from side to side. The static charge built up on the bristles will attract the dust particles off the sensor. Repeat if necessary. Shoot another test shot to make sure that all the dust has been removed.
STEP 5 If a dust spot cannot be removed with this method, and doesn’t move from its position, you’ll need to use a ‘Wet Method’ such as a swab designed for this purpose. Take a swab and apply a drop of cleaning fluid (not too much or it will smear). Gently swipe the swab from one side of the sensor to the other.
 48. Calibrate Your Monitor and Printer
Okay, it’s a boring job, but if you want good, consistent prints, then it’s something you need to do. And when better than on a dark, rainy night when there’s nothing worth watching on the telly? There are several calibration devices on the market now, notably the Pantone Huey Pro (www.colourconfidence.com) which not only will calibrate your monitor but it will adjust it as the ambient light changes, so your screen will look perfect from dusk till dawn.
For perfect prints, download an ICC profile from your preferred ink and paper manufacturer, or use a professional service specific to your printer (www. pureprofiles.com); it’s easier and cheaper than DIY methods.
49. Sign up for a Course or Photography Talk
Go back to school to improve your photography. There are hundreds of evening classes, held in colleges and adult education centres all over the country, and day or weekend courses aimed at all sub-genres and levels of knowledge. Check out the workshops at www.rps.org/, sign up for some specialised Canon EOS training at: www.experience-seminars.co.uk or visit your library for details of local events.
50. Start a Photo Blog
Blogging, if you haven’t heard, is rather popular on the web these days. Basically it’s an online diary and can be based upon your written observations and words of wisdom, or be based around adding a new photo every day. You’ll need some discipline to keep it going but if you’re good you’ll soon attract a following. Visit: www.photoblogs.org to see some examples.
51. Make a Calendar With Your Pics
Another great way to put your best digital photos to good use is to make your own calendar. There are lots of web sites that offer this, try Photobox at: http://www.photobox.co.uk
 52. Enter a photographic competition
You have to be in it to win it, as the saying goes, so why not enter the next photographic competition you come across. There are prestigious international competitions such as Travel Photographer of the Year (www.tpoty.com), Shell Wildlife Photographer of the Year (www.nhm.ac.uk) and Landscape Photographer of the Year (www.take-a-view.co.uk).
53. Produce a photograph lit only by candle
Experience the challenge of ultra low-light photography without leaving your home by using only a candle or open fire as your light source. You’ll need to experiment with your white balance to find the position that gives you the most pleasing results.