
Elements Top Tips Page 3

LOVE PHOTO BOOKS BUT HATE THE TEMPLATES? (Above)
Many users love the Bound Photo Book feature but don’t like the pre-made templates that come with it. If you want to take back some design control, then create each of the book pages (complete with text, images and backgrounds) individually as Elements documents and then insert these pages as full-page photos into the Full Bleed book option in the creations wizard
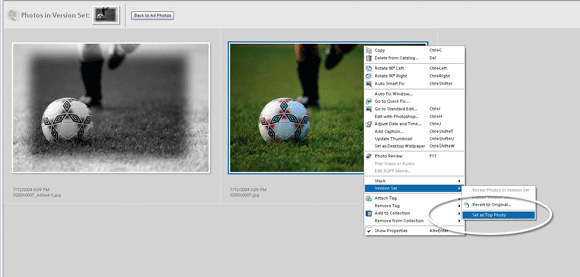
SAVEABLE UNDO – VERSION SETS (Above)
The Version Set feature in Elements is a terrific tool to use when you want to produce a range of editing outcomes from a single photo. As you make changes to the file in the Editor workspace, be sure to save each different enhancement outcome as part of the version set (use the checkbox at the bottom of the Save As dialogue). Now when you close the file, the saved stages of the edit process are stored along with the original. Using the right-click pop-up menu you can elect to display the photos in the set and then promote any version to the top of the set.

RED-EYE CORRECTION ON THE FLY (Right)
Next time you have to correct the red-eye in a bunch of party photos, try the Red Eye Removal Tool in Elements. Long before this beauty ever appeared in Photoshop, Elements users had been using this one-click wonder to correct the red eye in their flash photos. Simply select the tool and click on the red part of the eye. Elements determines the extent of the red and converts the colour to a more natural dark grey. If the program is having trouble removing all the problem colour, try click-dragging a marquee around the offending pupil.
MATCH PHOTO FORMAT TO PAPER PROPORTIONS PERFECTLY
Next time you want to ensure that a photo will fit perfectly on a specific size of printing paper, reach for the crop tool. Select the correct proportions from the options in the Aspect Ratio drop-down menu and then proceed to crop the photo to the format of the printing paper.
IMPORT DON’T INPUT YOUR CONTACTS
With the Order Prints and Photo Email features making use of the email and address details from the Elements Contacts Book, adding in a list of your nearest and dearest could be quite a task. But rather than retype all this data, simply import the contacts lists from other programs on your computer. Select Contacts Book from the Edit menu, then click the Import button. Choose the program where the list is stored, then click OK. The contacts and their details are automatically imported and ready to use.
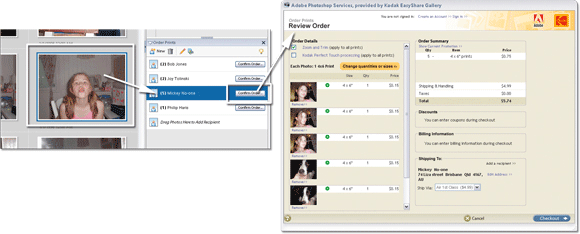
MULTIPLE PRINTING AND DISTRIBUTION ON THE FLY (Above)
You know the story. You’re the only one at the family reunion who remembered to bring a camera and now every uncle Tom, Dick and Harry (and that’s not mentioning your aunt’s requests) wants a copy of the photos you took. I’m sure, that like me, there are plenty of readers who just don’t have the time to spend the next few weekends printing and posting the pictures to your favorite relatives. Well, sigh no more. The Order Prints pane in Elements provides a print and post solution with drag-and-drop simplicity. After adding in the addresses of family members, simply drag the picture from the organizer work space onto the print pane and a print order will be created. Next, click the Confirm Order button and the order is sent to an online print provider such as the Kodak Easy Share Gallery. Add in some credit card details and the pictures will be printed and posted out to your relatives in a matter of days.