
Elements version 5.0 contains a custom control for transforming your colour photos to greyscale. Adobe expert Philip Andrews shows you how to use it
 Transforming a colour photo to greyscale is not as simple as it first seems. Many converted images seem a little flat and lack the separation of tones that existed in the original photo. The trick with good conversions to greyscale is ensuring the hues in the original picture are translated into distinct and different tones. Unfortunately most single-step methods don’t involve the necessary controls to ensure such distinct tones result.
Thankfully Adobe introduced a Convert to Black and White feature (Enhance > Convert to Black and White) in version 5.0 that allows you to customise the way colour areas are mapped to grey during conversion. The dialogue consists of a large before and after preview, a series of six conversion styles that are based on popular subject types or conversions, and four slider control buttons for fine-tuning.
This feature is great for situations where the colour contrast of a scene isn’t reflected in the monochrome conversion. Imagine the colour contrast of a red rose against green foliage. Using a simple conversion feature such as Remove Color would result in the rose and foliage being the same tone of grey. With Convert to Black and White the contrast of the original can be retained by boosting or reducing the prominence of green or red parts of the picture.
|
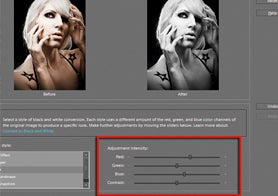
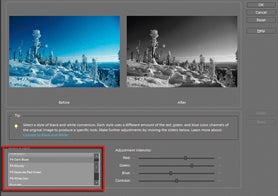
Step 1 – Choose Conversion Style With a suitable colour image open in the Full Edit workspace, go to Enhance > Convert to Black and White. Click through the different conversion styles menu checking the ‘After’ preview for a suitable result. Click OK to apply the conversion, Reset to remove current settings, or Cancel to quit the feature. |
Step 2 – Adjust Intensity For a more customised conversion start by selecting a conversion style that is closest to your desired result and then fine-tune the results with one of the Adjustment Intensity sliders. The effects can be more dramatic by also applying the opposite adjustment in the other two colour channels. |
|
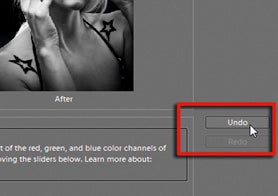
Step 3 – Check Results In situations where the changes you make to your photograph produce results that are undesirable you can return the ‘after’ image back to its default state by clicking the Reset button in
|
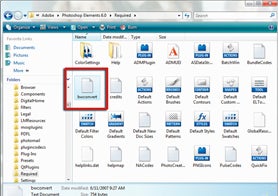
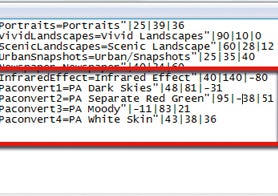
Step 4 – Open Presets Text File The preset style entries in the Convert to Black and White feature are controlled by a text file, ‘bwconvert.txt’. Happily, you can edit and customise it. In Windows locate C:Program FilesAdobePhotoshop Elements 6.0Required folder. Open the bwconvert.txt file with Notepad. Save a copy as bwconvert.old so you can swap back if needed. |
|
Step 5 – Enter Custom Preset Values With the file open in Notepad select and copy (Ctrl C) all of the last entry line and paste (Ctrl V) the copy below all the other entries. Substitute your own entry name – I used ‘Paconvert1’ – and the title that will be displayed in the dialogue box (‘PA Dark Skies’). Add in your own Red, Green, Blue slider settings. Values range from -200 to +200. |
Step 6 – Save and Restart Elements Make sure the entry is in the exact same form as the existing ones and then save the changed file in the TXT (text) format. Restart Photoshop Elements to register your new Convert to Black and white entry. As with all styles, to fully suit your images, apply the style first and then tweak the results with the sliders. |
Top Tip: Saving Your Settings
With such a broad range of settings possible with each of the Red, Green and Blue sliders, sometimes it is difficult to know just what values will give the best results. The way to work around this is simply to make the adjustments to an example image first. When you are happy with the conversion result, move the mouse pointer over the slider control. The value of the setting will be displayed. You can then inset this value, along with the other slider values, into a new Convert to Black and White entry and apply these to your images.