
Free calendar 2012 templates for you to create your own 2012 calendars
How to use the WDC calendar templates
Step 1
Download our calendar template. Open up your calendar template and your first image in Photoshop
or Elements. Your image needs to be in landscape format.

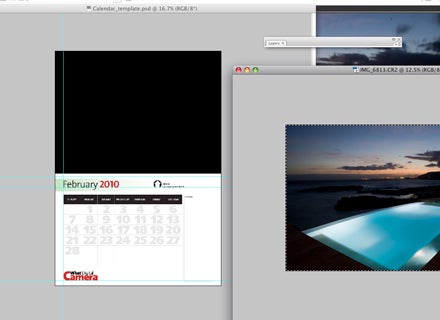
Step 2
On your image select all (Ctrl+A) and copy to the clipboard
(Ctrl+C). Now click on your calendar template and in the layers palette
(F7 to display) click on the folder marked ‘Put your image in here’ and
then paste in your image (Ctrl+V). Now adjust the size of your image
using the Transform tool (Ctrl+T) to fill the black space, and hit
Enter when you’re happy.
 Step 3
Back in the layers palette, click on the arrow to the left of the Months folder to reveal a list of 12 folders. Click on the box to the far left of the month you want so the eye symbol shows and make sure none of the other months have the eye next to them.

Step 4
Now click on the arrow to the left of your chosen month to reveal the contents of that folder. Double click on the icon marked ‘Caption goes here’ and then type in your caption. This should appear on the page.

Step 5
Once you’re happy with your design, go to File>Save As (Ctrl+Shift+S) give your file a new name and save it as a JPEG. Now open up your next image and repeat for each month.

Once you have all 12 months complete you can print them out onto A4 paper to create your calendar. Most local printing firms or larger companies such as Staples offer a binding service for just a few pounds, so you can get a professional looking ring binding added to your calendar to hold it together.