
How to Shoot… Black & White – Camera Functions
Mono modes/Colour modes
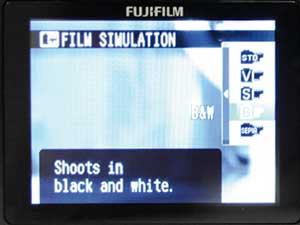 Most DSLRs and some compact cameras allow you to fine-tune their colour settings to produce colours to your liking straight from the camera. This is ideal if you are planning to print straight from your memory card or even minimise the amount of adjustment time in editing software. Among the Vivid, Natural and Landscape colour options, many will also offer a Monochrome setting.
Some will even allow manual adjustment of this colour setting, therefore allowing you to fine-tune your mono image for contrast and maybe even the use of a coloured filter for specific black & white effects.
Live View
If you are using a black & white mode on your camera, the live view function can provide an essential preview into how your composition will look in mono. It takes time to gain the skills to visualise the world in terms of black & white, so having this facility makes the process much easier and means you are more likely to come out with a successful shot.
Scene modes
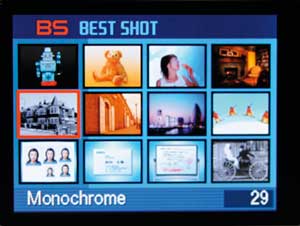 Entry-level DSLRs and most compacts offer the user a selection of subject-specific scene modes; allowing the camera to adapt to the type of image being taken to deliver better results. In most cases this will include a monochrome or black & white mode. This usually works by simply reducing the saturation of the image and can occasionally look a little flat, but for a quick black & white shot it is ideal.
ISO
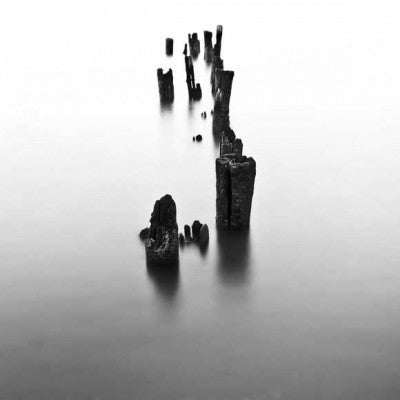
Black & white shots, particularly in a documentary style, are often associated with grain. High-speed film used to deal with low light situations and leaves a grainy look to the image, which is often part of its charm. This effect is similar to the noise created from using higher ISO settings on a digital camera, and being in black & white means any noise that appears doesn’t have the usual multicoloured degradation. This means that if you’re shooting in low light, you should consider converting to black & white and, conversely, when shooting black & white, you have to worry less about using higher ISO values. However, it is worth noting that – especially for older cameras – even mono noise is not quite as pleasing as film grain and therefore should not be pushed unnecessarily high.
Metering
As mono images rely more on tone and detail to convey the image, the exposure is all the more critical. Though full evaluative metering should still be considered for most scenes, the use of exposure compensation may be necessary to keep the full range of tones. For trickier scenes, the use of spot metering is advised, as it will ensure your subject is specifically exposed for. Some users may choose to go as far as to use a separate light meter to measure incidental light for advanced scenes.
Exposure compensation
 When using evaluative metering for tricky scenes your image may not always be exposed how you would want it; this is especially true when trying to create high contrast scenes for black & white. One way to rectify this is to use the exposure compensation. This allows you to adjust your exposure by degrees of stops, with a maximum variance of up to 5EV on some cameras.
Raw Shooting
More than anything else, black & white relies on a large tonal range, and the best way to achieve this is by shooting in Raw. A Raw file retains the full 12 or 14-bit file, as opposed to a JPEG which reduces this to 8-bit in processing. This means more tonal information and more room for adjustment. If your camera allows you to shoot in Raw and JPEG at the same time, set your camera’s colour or filter mode to black & white, as this will create a mono JPEG – which you can use as a preview – but still retain the full colour file in the Raw for post-processing.
Digital Filters
Much like scene modes, these can be applied before you shoot to create certain effects in your image. However, these tend to be more creatively based than subject led, and often require the camera to perform some processing rather than just adjusting the camera settings. The range of black & white options tend to be more extensive with high contrast mono modes or even – as on the latest Olympus models – a grainy black & white film mode.
In-Camera Processing
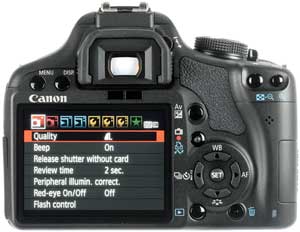
 Instead of making your adjustments before taking your shots, this allows you to perform image alterations afterwards while reviewing. DSLRs such as the recent Nikon entry-level models allow you to change format, crop, apply effects and, handily, convert to black & white, saving both the new and original versions to the memory card.