Software: Photoshop and Photoshop Elements
Skills learnt: A technique for lightening and darkening picture parts using the Brush tool and Levels adjustment layers
Time: 15mins
There are few photographs that are not improved with a little dodging and burning designed to rearrange the tones within the image. The idea of darkening or lightening different parts of a picture to give emphasis, and focus attention, harks back to the days of the darkroom.
Photoshop and Elements have long had specific tools devoted to the task, but what if you want the flexibility of painting in your density changes, but also want to apply these changes non-destructively? In this issue we’ll look at two approaches to making local density changes using features found in Photoshop and Photoshop Elements.
Let’s start with a solution that works equally well in both Photoshop and Elements, and combines the tonal control of the Levels feature and the abilities of adjustment layers and their associated layer masks.
Simply follow these steps to add an adjustment layer effect and burn in non-destructively.
How To Add Contrast and Colour
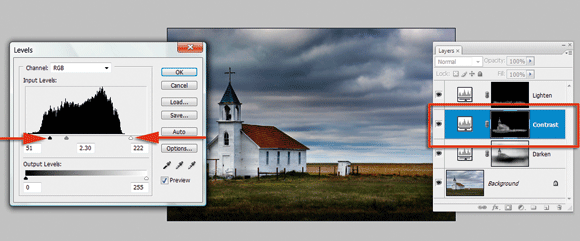
Don’t think that this adjustment layer approach is restricted to adding or subtracting density. You can also alter contrast by adding an adjustment layer where the white and black point input sliders have been moved towards the centre of the histogram. When making such contrast changes, hold down the Alt/Opt key to preview highlight and shadow clipping warnings. To manipulate the image’s colour you can select one of the colour channels (R,G,B) from the Channel menu in the Levels dialogue. Moving the midpoint slider right or left will alter the colour of the middle values in the photo.


