
Despite the origins of the black and white photograph, producing greyscale images in the age of digital photography is definitely not an ‘old skool’ activity. The sheer power and beauty of a well-produced monochrome image means that this style of photography is as popular as ever. In fact, producing black and white pictures digitally provides us with more choices and more power to customise and fine-tune these images than ever was the case when film was king.
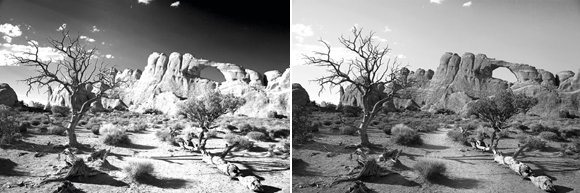
To give you some idea of the possibilities, in this tutorial we take the same image and convert it to greyscale in three different ways. (Above) All the techniques have their own strengths and weakness. Try them all and find your favourite.
HUE AND SATURATION METHOD
Photoshop Elements uses the term ‘saturation’ to refer to the strength of the colours in a picture. Increasing saturation makes the colours in a picture more vivid; decreasing saturation makes the hues weaker. The program employs the Hue/Saturation (Enhance > Adjust Color > Hue Saturation) control to adjust the colour’s strength. If the Saturation slider is moved all the way to the left of the dialogue (to a setting of –100) then all colour is removed from the picture. You are effectively left with a greyscale or black and white photo that is still an RGB file. This means that even though the photo no longer contains any colour, the colour mode it is stored in can still support colour. So if you want to try a little digital hand colouring, or experiment with pictures that contain monochrome as well as colour components, then this is the technique for you.
Be warned though, once your picture is desaturated the colour is lost forever and so it is always a good idea to use layers, making a background copy first. Or alternatively, save a copy of the colour version of the image before proceeding to change the file.
 STEP 1
The easiest way to remove the colour from a photo is to select the Hue/Saturation control from the Adjust Color heading in the Enhance menu and drag the Saturation slider all the way to the left (-100). Alternatively, you could use the Enhance > Adjust Color > Remove Color option which produces the same results as moving the Saturation slider in the Hue/Saturation feature.
 STEP 2
Such simple conversion techniques often need a little tweaking afterwards in order to balance the tones. Start adding in a Levels adjustment layer above the image layer. Drag the black and white input sliders towards the centre to add contrast (or the output sliders inwards to reduce contrast). Moving the midtone input slider to the right will darken the photo, and moving it to the left will lighten it.
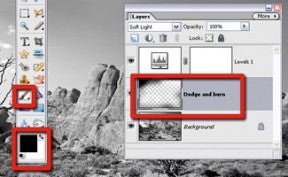 STEP 3
Finally, add some drama to the picture by selectively lightening and darkening parts of the image using the Dodging and Burning-in tools. For a non-destructive alternative, add a new blank layer above the image layer and change the Blend Mode to Soft Light. Then use a white soft-edged brush to lighten areas and a black soft-edged brush to burn in detail.