
Using your flash effectively will help you to grow your photography skills immeasurably. We take a look at the different types of flash on the market and how to make the best use of them.
Complete Guide To Flash – When and How
When to use flash
Flash is useful in a wide range of situations. The most obvious of these is when ambient light levels are too low to get a decent image without cranking up the sensitivity to noise-inducing levels.
If you’re using a camera with a pop-up flash on any of its fully automatic modes then the camera will likely engage the flash automatically for you.
If, however, you’re shooting in Program mode or any of the semi-manual or fully manual modes then you will probably need to force the camera to employ flash by pressing the relevant buttons yourself.
Without Fill-flash
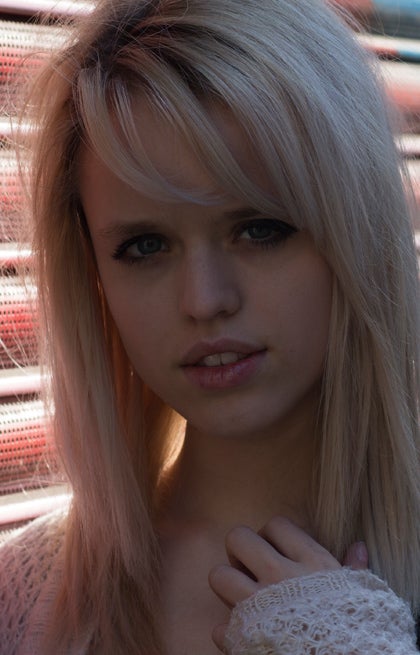
Using flash in daylight
Flash isn’t just for use in the dark. Indeed, some of its best applications are reserved for use in daylight when there’s plenty of light available, for example when shooting directly into a bright light source such as the sun. This is where the use of fill-flash can come in handy.
Fill-flash is essentially a way of using flash to illuminate nearby subjects (or objects) to help them stand out from a bright background, while still retaining some highlight detail behind them.

With Fill-flash
If you don’t use fill-flash when shooting directly into bright light then any objects in front of the light source will end up as dark silhouettes that lack any detail.
In addition, fill-flash can also be used to smooth out any harsh shadows caused by shooting with the sun shining directly onto the subject at an unflattering angle.
Bounced flash
One problem with using direct flash indoors (i.e. flash that’s pointed directly at the subject) is that it can cause unsightly shadows, especially when the subject is standing close to a wall.
One way around this is to use ‘bounced’ flash. This involves angling the head of your flashgun so that it points towards the ceiling or an adjacent wall. This has the effect of softening the light, which in turn reduces the harshness of any shadows behind the main subject.
Given that the light has to travel further you may well want to increase the power slightly – most flashguns allow you to do this via dedicated buttons on the unit itself.
You also need to watch out for unflattering colour casts that can be caused by bouncing flash off brightly coloured walls or ceilings.
Off-camera flash
The technique of positioning your flashgun off-camera has grown hugely in popularity in recent years with whole communities and websites dedicated to the art of getting great photos using one or more flashguns positioned off camera.
To get involved you’ll need a camera with a pop-up flash that’s capable of acting as a flash commander, or a set of remote flash triggers. Thankfully the latter can be purchased on eBay and suchlike relatively cheaply.
In addition, your flashgun will also need to have the infrared or wireless capabilities required to allow it to act as a receiver. Once you’re set up with all the right equipment the creative possibilities are near endless, which makes it a very exciting and fun branch of flash photography to explore and experiment with.
Where you choose to place your strobes will, of course, depend on the situation and the lighting effect you want to create. If you’re interested in learning more then one of the best places to start your off-camera education is Strobist, which contains an excellent ‘Lighting 101′ educational module on the subject.