
Essential guide for learning how to archive and backup your photos

Now that image storage has moved out of the realms of boxes filled with negatives and slides and into hard drives and DVDs (or other optical discs like Blu-ray), the need for physical space is reduced. The options for archiving images are now numerous, from simply buying a larger hard drive to purchasing online storage.

For anyone with a computer, the perils of saving all your images into a single location are well signposted. Not only is there the potential for accidental deletion, but there’s always the potential for the hard drive to fail or corrupt. With all of your precious photos at the whim of a single device it’s worth considering a second mirrored drive so the failing of one drive won’t spell the end of your images. One option is to backup your files to optical disc. A DVD holds just 4.2GB, whereas a Blu-ray can hold either 25 or 50GB depending on size, though current BD-R write speeds aren’t as fast as DVD equivalents.
A second hard drive is an affordable option, with a 250GB drive costing well under £100. External options are just as cheap as internal hard drives and have the added bonus of portability that allows the same drive to be plugged in and read by multiple machines. This also allows you to store the drive away from your machine in case of theft or fire.
The method you use to connect your drive can be very important, especially if you are dealing with large amounts of data. USB 3.0, SATA and FireWire 800 produce some incredible read and write speeds, ensuring you barely notice that the drive isn’t within the computer. Some slower connections may be marginally more noticeable, but for copying and retrieving files the likes of USB 2.0 is perfectly usable. Most large-capacity drives are still mechanical, meaning physical moving parts that can break – so you must be careful with them.
Flash memory options, such as USB sticks and memory cards, also sit externally from the computer, but are more limited for storage. The current largest USB thumb drive is 256GB, which costs some £600, meaning you’d spend around six times more than on a normal hard drive to get a similar amount of space. Like many hard drives, USB sticks often have built-in backup software, meaning only a few button presses are required to archive the information.
Online backup is an entirely different system, removing the physical aspect from your workstation by utilising the internet as a tool to access remotely stored files. The time it takes to upload and retrieve files is dependent on connection speed. Although many sites require a paid subscription, your files will be kept entirely separate from your computer, and thus any possible hardware failures.
Plugging in and using an: external hard drive
Step 1 Find a port
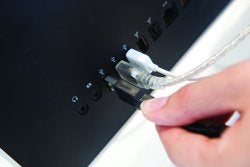 Identify a spare port on the computer. Turn the computer off while doing this, as it may require unplugging or reconnecting various accessories. Turn the computer on and allow the operating system to detect the drive.
Step 2 Rename
Once the computer starts it will identify the hard drive with a designation letter. If the drive is going to be permanently attached, rename it as ‘Backup’ or something similar to prevent confusion when other drives are attached.
Step 3 Backup
Create and name folders for each media that will be backed up. Photos, video and documents are normally a good start, then within each folder give dated or subject-specific names to the folders.
Not sure what to buy? View our backup choices for external hard drives.