
Wouldnu2019t it be nice to be able to see how a photo would look printed on specific paper with a particular printer before you go to the time and expense of producing the hard copy? Well Photoshop provides a unique way to do just this using its Soft Proofing command.
Simply choose the style of proofing you require first from the View > Proof Setup menu. Choose custom if you want the option of picking specific printer profiles and rendering intents. Then select View > Proof Colors to see a simulation of how the picture will look when printed. To check if any of the colours in the photo fall outside of the range that can be printed choose View > Gamut Warning.

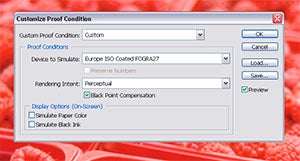
01 The first step in soft proofing is to set up Photoshop so that the program knows the type of printer that you are trying to simulate. Do this by either selecting one of the general options from the View > Proof Setup menu or by picking specific printer and rendering intent values from the View > Proof Setup > Custom dialogue.
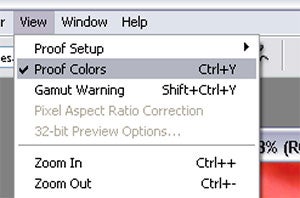
02 To see a simulated preview of the photo as it will print select View > Proof Colors. To compare before and after versions use the Ctrl/Cmd Y keystrokes to switch from one to the other.

03 You can take the preview process one step further by checking to see if any of the colours in the photo fall outside the range that can be printed by the printer that you are proofing. Do this by selecting View > Gamut Warning. Any problem hues will be marked with gray in the preview.
In Photoshop:
View > Proof Colors
View > Proof Setup
Win: Ctrl Y Mac: Cmd Y
View > Gamut Warning
Win: Shift Ctrl Y Mac: Shift Cmd Y
In Photoshop Elements:
Photoshop Elements doesn’t contain the soft proofing options listed here.